


Manual Mode & The Exposure Triangle
When it comes to shooting on an SLR or mirrorless system, full manual mode can be intimidating for most newcomers and even seasoned hobbyists. It can also be tricky to get the settings you need quickly and as such many experienced photographers use other priority modes over full manual.
However, manual mode should never scare you off – it’s often the only way to grab the perfect exposure.
The functions of manual mode fall into a pyramid known as the ‘exposure triangle’: three elements which go hand-in-hand to decide how to ‘expose’ a photograph – or to decide how much light is in the images.

- ISO – this is the setting which determines how sensitive your camera is to light. It can be digitally-increased, but this costs, as grain and noise enter the image. ISO ranges vary from 100, 200, 400, 800 up to 1600, 3200 and 6400.
- Shutter Speed – this dictates the speed that the shutter is open to expose light onto the sensor. It ranges from slower speeds like 1/10 (one tenth of a second) up to faster speeds like 1/125 (one hundred and twenty-fifth of a second). The slower the speed, the more light fills the image, but you’ll need something to avoid motion blur. The faster the speed, the better the freeze motion (but less light enters the camera.)
As a general rule, your shutter speed should be set to your lens’ focal lens (a 300mm lens should have a 1/300 shutter speed) to avoid motion blur.
- Aperture – refers to a hole within the lens which permits light into the camera. The larger you set the hole, the more light enters the camera. Aperture is expressed in “f” numbers, which refers to the diameter of the lens aperture to the length of the lens. This ranges from F/1.4, f/2.0, f/2.8, f/4.0. The higher the number, the less light enters the image. Wider aperture (lower number) is also responsible for creating depth of field – so set it low if shooting portraits or you want a blurry background.
So, when you’re shooting an image you’ll need to set an aperture that allows enough light while achieving the effect you want (blurry background or in focus), set an appropriate speed (freeze the motion or allow blur) and select your ISO to compensate (the higher the noisier, so be careful).
Understanding the ‘exposure triangle’ when shooting.
So, in order to take good pictures you need to produce sharp, well-lit photographs. To do this, you’ll need to get your settings right by working with the ISO, shutter speed and aperture. We’ll talk through a few examples to help show how these factors work in unison when shooting.
How to freeze action: When you’re attempting to freeze action you’ll need to select a fast shutter speed. This means you’ll need lots of light, as the faster you set your shutter the less light enters the image. Your ISO can be increased to help, but you’ll also need to set your aperture to a low F stop number to let in more light.
How to shoot in low light: when you’re in low light, it can be tough to get a satisfying image. Your shutter speed will generally need to be lower, your ISO higher and your aperture wider to try and get as much light as you can.
This means you’re best off buying a tripod to help avoid motion shake and setting a low shutter speed (as lower shutter speeds let in more light but will pick up your hand shaking.)
How to shoot good portraits: To create pleasing portraits, you’ll need a wider aperture so that your subject is in focus and your background is blurry. However, you’ll need crisp focus so make sure your shutter speed is fast enough to freeze motion.
With these examples, you can see how ISO, shutter speed and aperture work together to allow light into an image. However, shooting fully manual offers lots of other options for changing your image quality….
Exposure compensation
Marked by an AV +/- icon, exposure compensation is an option to increase or decrease the light in an image beyond the standard exposure.
Particularly useful in tricky light, exposure compensation works by increasing or decreasing by one full ‘stop’ each time you adjust it. A snowy scene you want to brighten up to make the snow whiter, for instance, demands an EV +1 value.
You can use AEB (Auto Exposure Bracketing) if your camera has it to take multiple shots at different exposures. In the image below, the bracketing will take three photos at three different exposures.
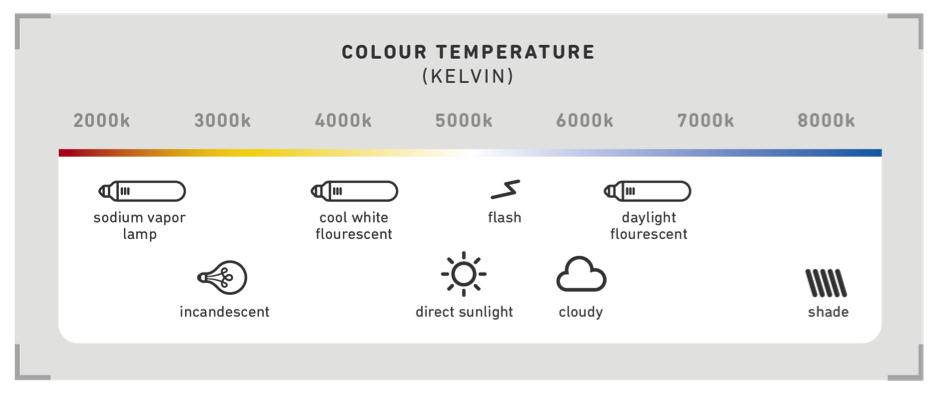
White balance
Not entirely relevant to exposure, the white balance setting helps set the colour tone of an image through the ‘temperature’. Most DSLR’s have pre-sets such as incandescent, cloudy and direct sunlight. These correspond to colour temperatures in Kelvin units. You can either select AUTO or one of these pre-sets. If you shoot in RAW (which you should) you can change the white balance setting later.
- By Andi Thomas
- 23 May 2016


