


Essential guide to low light photography
How to take better photos in different lighting
Photography and light go hand-in-hand. Lighting in an exposure sense is the most important aspect when it comes to getting the right shot. Different lighting conditions dictate how you’ll have to use your camera – changing the exposure settings such as ISO, shutter speed and aperture.
Here’s a guide to a few common lighting conditions and how to improve your photography in them.
Tripod vs handheld
In optimal lighting conditions you can shoot handheld – but be wary of motion blur caused by your hand shaking. This occurs when your shutter speed is set lower than your minimum focus distance. For example, for a 50mm lens you’d want a shutter speed of at least 1/50 to keep the blur down (although some will still occur.)
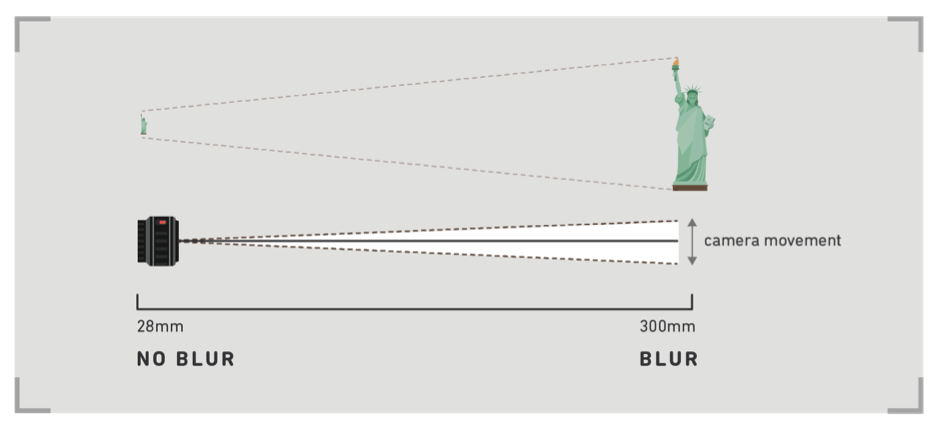
Because your focal range drops in lower light (explained later) you won’t be able to shoot handheld if you want to capture vibrant night images. In situations like this, you’ll need to put your camera on a tripod.
Bonus tip: set your camera’s timer to 2 seconds before you take a tripod shot. This will eliminate any shake caused by you pressing the shutter.
Daylight
The optimal time to take photos is in daylight. You get to set a higher shutter speed to freeze motion and can play around with aperture – from wide to narrow – without darkening the image too much. You’ll generally be able to have a low ISO. Normally you’ll want to shoot with the light behind you. It can be useful to use manual focus if your subject is very bright, as autofocus may continually hunt.
However, taking interesting photos in the daylight means hunting for optimal lighting. Sunrise and sunset are generally the best times to take pictures as the light will be more visually appealing.
- Shoot with the light behind you – but there are exceptions.
- Shoot with a low ISO setting.
- Try different white balance settings. Daylight or sunny settings may yield better results than auto.
- Sunrises create vibrant skyscapes and are ideal for landscapes – set your aperture to a narrower number like F/11 and use manual focus to get everything crisp.
In optimal lighting you can play with aperture and shutter speed while still retaining plenty of light in the image – so experiment and see what works best.
Evening
As the light begins to lessen and give way to night, your photography skills will be tested. Your images will produce varied results, so it’s always better to shoot in RAW to give you access to lots of post-processing options. As the light lessens, you’ll have to start upping your ISO which can create unwanted noise. Lots of modern DSLR’s have an auto ISO function which will pick out an appropriate ISO for your exposure – but you’ll need to specify a maximum ISO to avoid very noisy images.
- As light lessens, up your ISO to help compensate.
- Shoot in RAW to help you tweak photos post-shot.
- Slower shutter speeds and wider apertures help brighten up the image.
Sunsets are dramatic, but you’ll need to try different white balance settings to accommodate the changing temperatures. Change metering modes to try and make the most of the colour in the sky.
Night
Once night sets in, your photography style will have to shift in order to capture great shots. If you’re avoiding a tripod and focussing handheld in low light, set your ISO make sure you set your focus point to the central point as this is often the best and more accurate point.
Using a flash may be a necessity in night settings, but your camera’s built-in flash can also flatten an image. Consider diffusing the flash with a DIY solution like a piece of milk carton or purchase an external flash which allows you to bounce light off a wall or roof instead of flattening your subject.
A tripod will make night photos infinitely easier, as a lower shutter speed becomes a necessity in order to get a good exposure. Tripods help eliminate hand shake and allow you to set a far lower shutter speed. Use a narrow aperture to get a starburst effect from streetlights.
- Use a higher ISO but be aware that too high a number will give your images lots of grain.
- Use a tripod and 2 second timer to keep shots still.
- Use a lower shutter speed to allow more light into the lens – this can be used for light trails and other popular effects.
- Use a lens hood to minimise lens flares and lighting outside your frame.
- Use a torch or flash to ‘paint’ an area you want to shoot with light.
- By Andi Thomas
- 26 Apr 2016


