


A Guide to Low-Light Metering
Capturing worth while photos in low-light conditions can be a challenge, simply because of the definition of photography. Merriam-Webster states that photography is ‘the art or process of producing images by the action of radiant energy, and especially light, on a sensitive surface (as film or an optical sensor).
Reduce the amount of light available at a scene you are attempting to capture, and you’re taking away a vital component of photography.
One way to get around this is to activate the flash on your camera when taking photos in low-light conditions. However, there are some issues with using a flash. These include:
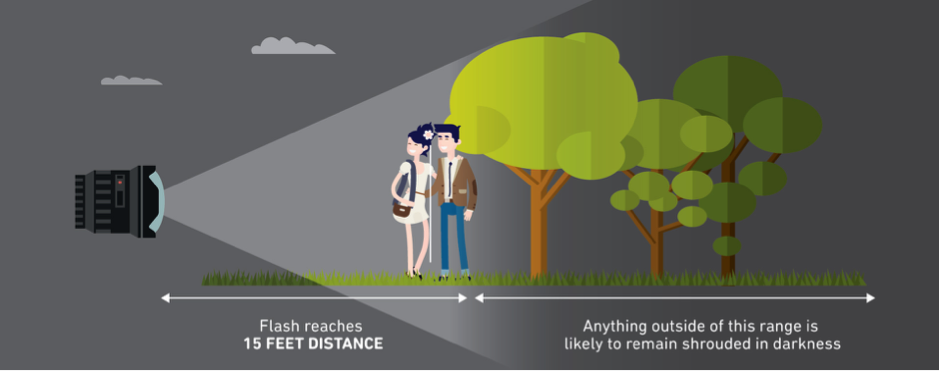
- The flash only reaches as far as 15 feet on most cameras, so anything outside of this range is likely to remain shrouded in darkness.
- A flash runs the risk of you receiving a well-exposed photo as opposed to one which displays a bright overexposed foreground.
- If you’re taking a photo where the subject is above you (for example, a musician on a stage when you’re in the standing section of a crowd), the flash is at risk of casting unwanted shadows, due to your position making for an unnatural angle for the light.
Get around such issues by becoming skilled at low-light metering instead. The following guide provides you with the tips and tricks to become an expert in this area of photography:
What is metering?
Let’s first analyse what is meant by metering when it concerns photography in general, before we delve into how to become a professional at low-light metering.
Metering is the function of your camera being able to determine what the correct shutter speed and aperture should be for a given situation. This is dependent on both the amount of light that goes into the camera, as well as the sensor’s sensitivity.
The majority of modern cameras come equipped with a light meter, which is a sensor that can measure the amount of light and its intensity ahead of any photo being taken.
Shoot in Manual Mode and you will see your camera’s meter in action — it’s the set of bars seen inside the viewfinder, which stretch left or right with a zero located in the centre. Position your camera so that it is shooting in an area of low light and the bars will stretch to the left of the 0 (the “-” side). Point towards a very bright location and the bars will go to the right of the 0 (the “+” side).
The trick is to get the bars to 0, as this will indicate an area of optimal exposure in accordance to the meter of your camera. The next part of this guide will help you get to this position when shooting in low-light conditions.
A higher ISO and watching your shutter speed essential in low-light conditions
Shoot in an area of low light and the shutter of your camera will likely need to stay open longer than normal in order to allow enough light in to capture a worthwhile photo. Bear in mind that a shutter speed that is too slow could result in unwanted movement being captured in the photo, which may result in a blur.
Due to this, you will want to obtain a faster shutter speed — shooting with a higher ISO will help to achieve this. Here’s how to set up your camera in this way:
- Activate Spot Metering on your camera — this setting informs the equipment to read the light from a concentrated area based around your chosen focal point.
- Switch your camera to Manual mode and the lens to Auto Focus.
- Adjust the White Balance on your camera to suit the level of light that you’re shooting in.
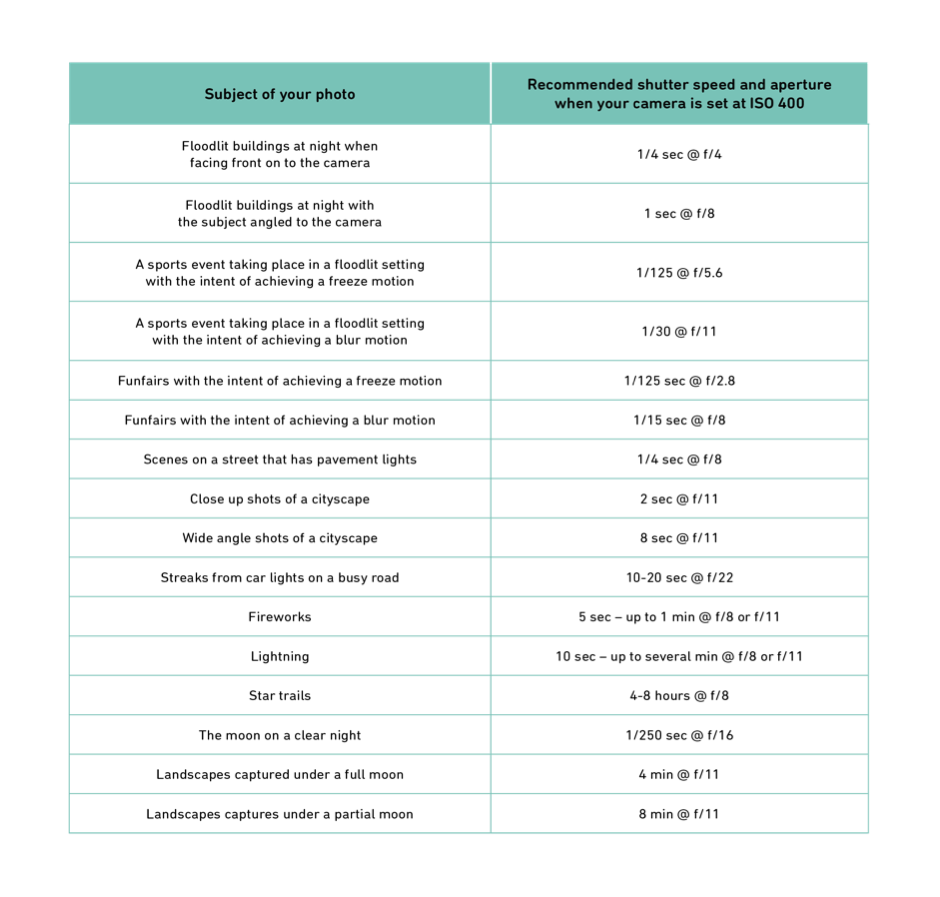
- Set the ISO of your camera to 400 and choose a wide aperture to allow enough light in for the shot. See the table below for a guide on selecting the best aperture for the subject you are trying to capture.
- It’s time to begin capturing the shot. Begin by aiming your camera at your intended subject and either zoom in or walk towards it, as close as you feel comfortable.
- Once you have found the perfect place to position your camera, locate the area of the subject that you want to be most correctly exposed.
- Check your shutter speed, again making use of the table below so you select the best speed for your intended subject.
- Adjust your camera’s light meter so that the indicator is either falling on 0 or at most one small line to the right of centre.
- Recompose your shot while ignoring the light meter settings, as your camera will now be picking up on light from around your subject. Fortunately, by now you will have correctly focused in on the subject that is important to your shot.
- Focus and shoot.
As mentioned in the 10-step guide, the following table courtesy of Light Stalking should act as a guide for getting the right exposure for a variety of scenes known to have low light:
- By Andi Thomas
- 5 Jul 2016


