


A Guide to Hyperfocal Distance
Hyperfocal distance can be a complex topic for beginner and experienced photographers alike. However, it is an invaluable skill to possess if you want to take the sharpest images possible — especially where landscape photographs are concerned.
This guide will help you to understand what hyperfocal distance is, how to set up your camera to achieve exceptionally sharp images and the kit that can assist with the whole process.
What is hyperfocal distance?
There are two ways to describe hyperfocal distance:
- It is the closest distance that a lens can be focused while objects at infinity are kept acceptably sharp. Once the lens is focused at this distance, every object at distances from half of the hyperfocal distance out to infinity will be acceptably sharp.
- It is the distance beyond which every object is acceptably sharp, so long as the lens is focused at infinity.
There are hardly any distinctions made between the two definitions. This is because they have almost identical values — the value computed according to the first definition exceeds that from the second definition by just one focal length.
Hyperfocal distance was a popular focus technique prior to autofocus cameras being introduced to the market. Even with advancements in technology, the method is still a popular go-to skill for photographers when their camera struggles to autofocus, especially in difficult light conditions.
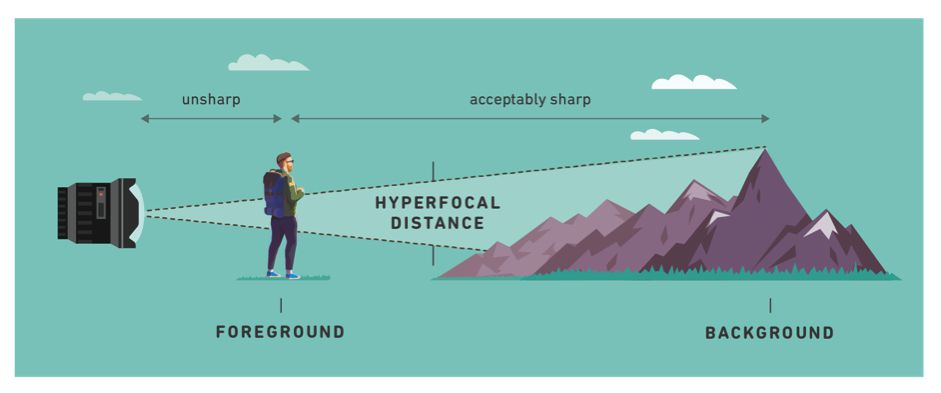
Where is hyperfocal distance located?
To better understand hyperfocal distance, it is wise to know just where it is located.
Imagine a scenario where you are hoping to take a landscape photograph and want both the foreground and the background to appear sharp. This can be difficult to achieve, as the background will appear blurry if you opt to focus only on the item(s) in the foreground. On the flip side, choose to focus on the background of the scene you’re trying to photograph and the item(s) in the foreground will now look out of focus.
To get the best of both worlds, the solution is to focus on a point that is set between the item(s) in the foreground and the background. This middle ground is known as the hyperfocal distance and enables both elements of the foreground and background to appear reasonably sharp.
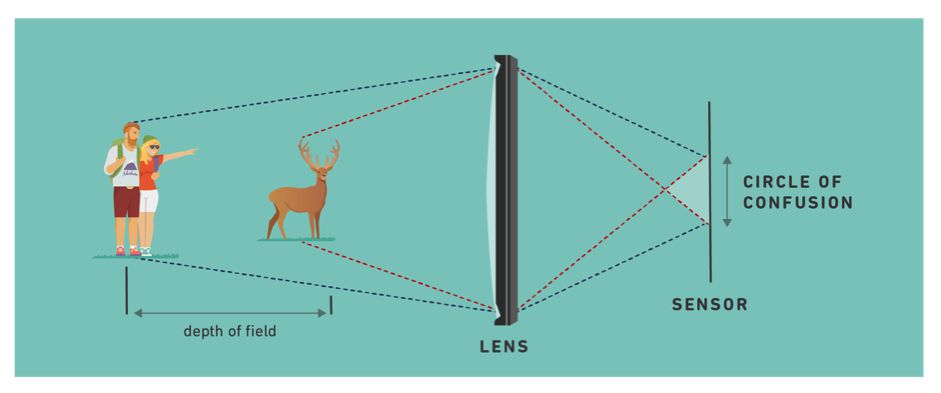
Factoring the circle of confusion into the theory of hyperfocal distance
If you are looking to delve a little deeper into the theory of hyperfocal distance, the circle of confusion is a good place to start.
Otherwise known as CoC, this is defined as the maximum size that an unsharp blob will appear to the human eye as being indistinguishable from a perfectly focused point.
Often the circle of confusion is stated as 0.030mm when it comes to 35mm film or full-frame sensors, as well as assuming a maximum print size of near to 10x8in. Of course, the CoC will vary when different formats require more or less enlargement to be achieved in order to record the same-sized print.
As a result of this, the COC makes up a portion of the equation needed in order to calculate both depth of field and hyperfocal distance.
When to use hyperfocal distance
As we touched on when describing where the hyperfocal distance is located, the method is only necessary when you need to focus on objects that are located both close (the foreground) and far away (the background) from your camera lens.
As a result, there is no need to measure hyperfocal distance if you standing on the shore and photographing an island far out at sea with no desire to focus in on objects that are close to where you’re located. Due to the nearest notable object being positioned at infinity — most likely on or close to the shore of the island that you’re photographing in this instance — it will be a better idea to just focus on the background to make it as sharp as possible.
How to use hyperfocal distance
Hyperfocal distance important for the image you’re hoping to capture? Here’s how to set it up:
1. Find the hyperfocal distance
Use a chart such as the one compiled by Digitalcameraworld.com seen below in order to find a photo’s hyperfocal distance. Simply work out the focal length of your lens and match it up to the aperture value that you’re going to use — the resulting figure is your hyperfocal distance.
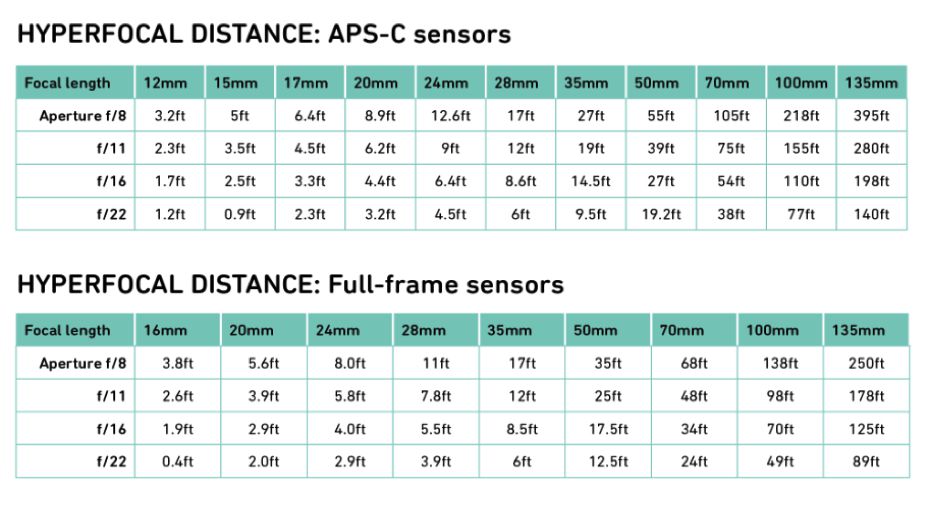
Once you have this, you can divide the distance by two and understand whether the closest object (i.e. the item in the foreground) will be in focus when you take your photo.
1. Line your camera up to the measurements
Now that you have the calculations, place your camera onto a tripod (the equipment will assist in achieving precise composition) and input your required zoom length. Once this is done, switch your camera to Av mode and also input the aperture value that you chose in the previous step.
Next, use a laser measuring device and line up the base measuring point of the laser measure to the focal plane marker found on the body of your camera — avoid measuring this point from the front of your lens.
2. Establish the perfect distance
Making use of your laser measuring device, move your camera until it is exactly at the hyperfocal distance that you have previously calculated in step one. Ensure that you have selected the same aperture value that you used to work out the hyperfocal distance in the first place.
From here, it’s simply the case of taking those exceptional landscape photos that you and those viewing your work will both cherish.
- By Andi Thomas
- 17 Jun 2016


