


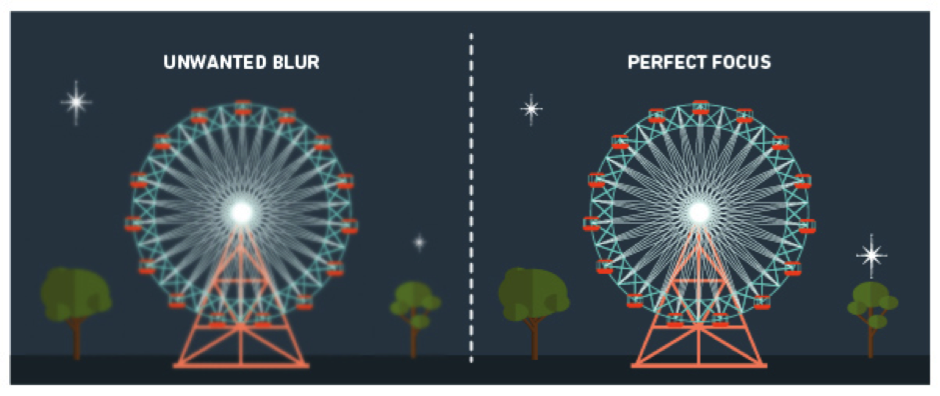
Finding Focus with Night Photography
When you’re shooting at night, the low level of light limits the performance of your camera. This tends to result in blur, which makes photos anything from inferior to unusable.
We’ve covered low light shots in this blog post, but to eliminate blur you’re going to need the following:
Compensate for longer exposures
Night photography means that your exposure time has to adjust in order for enough light to enter the image. In any semi-automatic or automatic shooting mode, the camera will pick out the best settings. In manual mode, you’ll have to test a few. No matter which setting you use, you’ll find your shutter speed drops immensely, from daylight speeds like 1/200 to 2”.
With this slow speed, you’ll need to compensate for hand shake and mirror vibration by placing your camera on a tripod. If you’re shooting handheld at night, the flash is a must, but is only effective for relatively close up subjects, flash only has a limited range of effectiveness and won’t help with landscapes etc. Buy a flash diffuser if you don’t want your flash to flatten images.
You’ll also need to find the right ISO, which is directly responsible for your camera’s sensitivity to light. A higher ISO number means your camera will be more sensitive to light and you’ll therefore get faster shutter speeds, but this adds in digital noise. Finding the correct balance between an ISO that brightens an image without making it noisy is a case-by-case situation, as it will depend on the light levels around your shot.
Find the sweet spot of your camera lens
The majority of camera lens’ will have a sweet spot — in other words the range within their aperture which allows the lens to work at their best in order to produce the sharpest images possible. Get it right and you’ll achieve maximum sharpness across your image. This technique not only assists you in low light applications, it’s good for any situation where maximum sharpness is a priority.
How do I find a lens’ sweet spot?
Follow these steps and the sweet spot of your camera lens should become clear:
- First, identify the lens’ widest or maximum aperture setting. This can found through a series of numbers often printed on the side or the end of a lens and will be written similar to ‘1:3.5-5.6’. For this arrangement, you can ascertain that the widest aperture that the lens can achieve when it’s zoomed all the way out is f/3.5. On the flip side, the widest aperture that the lens can achieve when it’s zoomed all the way in is f/5.6.
- Now that you have this information, you can now determine the lens’ mid-range sweet spot. All you need to do is to count up two f-stops from the widest aperture — this chart by flickr user Robin Parmar will help:

- Once your lens’ mid-range sweet spot has been identified, it’s time to get some test shots. Make sure that your camera is set to Aperture Priority mode — this allows you to control the aperture setting of your camera — and take a few photos at varying apertures.
- Analyse all of the photos that you have captured in order to determine which of the aperture setting presents you with the sharpest images. Found it? Your lens’ sweet spot has been established. This works in day and night photography, but is particularly useful when you’re in a situation more prone to blur (such as night photography).
Set manual focus
Autofocus struggles in the dark, so you may need to manually focus your camera to avoid blur. However, finding focus with your own eyes is equally hard when it’s night time. One trick that works well is to use a laser point to illuminate an area you’d like to shoot. Set the focus on that point and then take your shot.
Enable a camera’s mirror lock-up feature
Just the slightest of movements can cause your camera to shake. Such a vibration can be caused from something as trivial as the mirror of your camera hitting its foam dampers as it works its way to the top of its rapid travel. When you are shooting with a long exposure, these slight movements will create a large blur.
This is where your camera’s mirror lock-up feature can assist. Once activated, the mirror will raise up as soon as the shutter button is pushed. However, you are presented with a second or two delay in order for any vibrations to ease before needing to press the shutter button a second time to this time activate the shutter.
Keep your hands off the camera
This piece of advice follows on from the point in the previous section about even slight movements causing your camera to shake and creating blurred photos. Using a tripod with a timer setting on your camera or the use of a remote camera shutter release will help eliminate natural hand shake and the vibration of your finger hitting the shutter button. In night photography, this is essential.
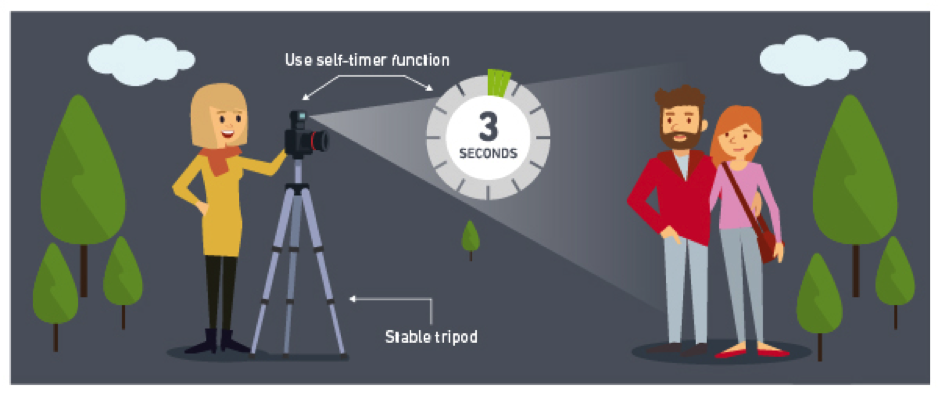
Instead of holding a camera in your hands throughout the entire duration of a shot, pop it on a stable tripod and activate its self-timer function to get around this issue. Do you require accurate timing in order to capture that sought-after image? We recommend you invest in a remote release tool.
Shooting at night can be very rewarding – but only if you take the time to master the techniques available to you to avoid blurry shots.
- By Andi Thomas
- 6 Sep 2016


