


The Beginners Guide to Buying a Telescope | Astronomy Guide
Looking for a simple guide on what to watch out for when buying your first telescope? Look no further! In this Astronomy blog, we go into the differences between a Reflector and a Refractor and help you learn your Alt-Azimuths from your Equatorials.
Choosing your Telescope
The first thing to do when going to buy a telescope is to ask yourself what is it that you want to use it for? There are traditionally three types of telescope tubes to choose from depending on how far into the universe you want to explore so this is absolutely the place to start.
Refractor - Best for viewing Moons & Planets.
Reflector - Most commonly a Newtonian Reflector. Best for viewing Moons, Planets, Nebula & Galaxies.
Compound - Most commonly a Cassegrain Telescope, it can also be a Maksutov. Maximum performance across the night sky, these make the best telescopes for viewing the planets in our Solar System and the galaxies beyond.
What is a telescope? A telescope is an optical instrument that uses either lenses, curved mirrors, or a combination of the two to view distant objects. They are most commonly used for astronomy, however many can also be used for viewing terrestrial objects on our own planet. Every basic telescope will consist of seven components that make up its construction: optics tube, mount, objective lens, eyepiece, focuser, diagonal and some form of internal lens/mirror system that directs the light.
So what is the difference? Every type of optics tube controls the light entering the objective lens in different ways. This is what distinguishes the individual models and makes them more suited to various scenarios. Take a look at the diagram below to find out what’s inside the different telescope designs.
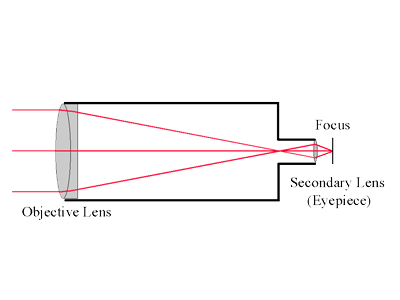 Refractor - Directs the light through the objective lens straight to the eyepiece. The most basic telescope design, the eyepiece is directly opposite the objective lens. Refractors produce the lowest quality imagery out of the three which is why these tend to be cheaper and aimed more towards beginner astronomers.
Pros: High contrast, optics tube is sealed from the elements, easy to use
Cons: Simple design can lead to aberrations, long focal ratios = longer optics tube
Examples: Celestron AstroMaster 70EQ Telescope
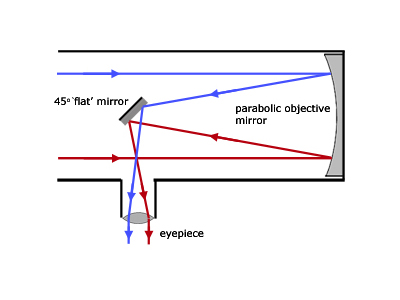 Newtonian Reflector - Uses a combination of a curved mirror and a flat mirror to reflect light up to the eyepiece. The eyepiece is found on the top of the optical tube at the same end as the objective lens. Reflectors range in price but hover around the mid-range mark. Their curved mirrors make them superior in quality to refractors as they eliminate any aberrations. Reflectors are excellent for enthusiastic beginners all the way up to semi-pros.
Pros: Highly reduced aberrations, internal mirrors reflect true light as opposed to bending the light, compact
Cons: Requires periodical cleaning and collimation (realignment)
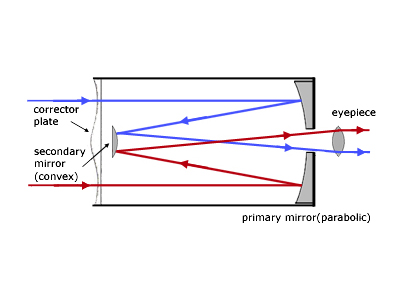 Cassegrain (Compound) - Uses a combination of a parabolic primary mirror and a hyperbolic secondary mirror to direct the light from the objective lens through the tube, ultimately landing at the eyepiece which is conveniently located at the opposite end of the tube. This complex design does make Cassegrain telescopes the most expensive out of the three however with this investment you are getting the best quality optics for sure.
Pros: High magnification and large aperture, comparatively lightweight
Cons: Complex internal composition increased price, narrower field of view
Choosing your Mount
Now you know which telescope design you are after, you need to decide which mount you want to use. Telescopes typically come in four different mounts: Dobsonian, Alt-Azimuth, Equatorial and Computerised. Each has its own benefits and price ranges so it’s good to get your head around what the different types do and if there are any restrictions that come with them.
Dobsonian
Getting its name from amateur astronomer John Dobson who popularised this simple design in the 1970s, this is an easy mount to use. They are straightforward to manufacture and therefore are a great, economical option for beginners. Their solid base design also makes these highly transportable. They are often identified by having “Dob” in their title.
Pros: Cheap, easy to use, highly transportable, Newtonian reflector optics
Cons: Not suitable for astrophotography, harder to track objects
Examples: Celestron FirstScope
Alt-Azimuth
This easy to use mount requires very little set-up. It is controlled via two panhandles (very similar to a pan-tilt tripod mount) to move the telescope’s altitude (up/down) and azimuth (left/right) position. This is generally the cheapest adjustable mount. They are often identified by having “AZ” in their title.
Pros: Quick set up, highly transportable, easy to get to grips with
Cons: Requires more adjustments to track objects
Examples: Celestron StarSense Explorer LT 80AZ
Equatorial
This mount will require some collimation when first set up and therefore a little more skill. Once set up however these are a fantastic manual mount. Counterweights allow telescopes on an equatorial mount to move in line with the Earth’s curvature meaning that once located it is much easier to track objects as they move across the sky. Some equatorial mounts are motorised (not to be confused with computerised) and will automatically move with the Earth’s orbit. This mount is particularly suited to those looking to do astrophotography where pin-sharp stars are the aim. They are often identified by having “EQ” in their title.
Pros: Very good for tracking stars, a great choice for astrophotography
Cons: Requires collimation, takes a little more time to get to grip with
Examples: Celestron AstroMaster 130EQ
Computerised
The most expensive and yet arguably, once set up, the easiest of the mounts to use. Computerised mounts require a simple alignment process which is typically done by finding three of the brightest objects in the sky. Once this is done the mount will be able to locate and track any object without the need for star charts. Many of the Celestron computerised telescopes also come with a SkyTour function that will find the best objects currently visible to you and offer further information. They will even let you record your own data that can be shared with official bodies such as NASA – how many hobbies let you talk to NASA?
Pros: No prior star knowledge necessary, will locate and track objects for you, excellent for pros and beginners, excellent for astrophotography
Cons: Requires collimation, generally most expensive and heaviest mount
Examples: Celestron NexStar 8SE
Choosing Accessories
There are a whole host of astronomy accessories to suit any path you choose to take your telescope down, but the most essential one for everyone is the Moon Filter. A Moon Filter acts in much the same way as sunglasses do, and reduce the brightness of the light to help your current vision. It is particularly useful when used on the Moon as it brings out many more details on the lunar surface. It is such a useful piece of kit that many astronomers advise buying one when you purchase your telescope because it will make your first stargazing experience that much more enjoyable.
With so many other accessories to choose from including Eyepieces, Barlow Lenses, Digiscoping Adapters, PowerBanks and more we may need to write a whole other blog covering that – so watch this space!
Which one to buy?
Astronomers always say opt for the best telescope you can afford right now. With telescopes, you will find that as the price increases, the quality does also, and this is a hobby that can grow with you as your experience and enthusiasm does. The fantastic thing about our Celestron Astronomy Range is that there is something that will deliver excellent quality for every budget. The most important thing is to get out there and start exploring, there will always be something fascinating to see. And if you need a hand deciding we are only a phone call or email away!
Thank you!
Thanks for taking the time to read our blog, we really do hope they help you out and answer some of your questions. If you still have some unanswered, then please feel free to get in touch with our team of experts.
We have a LiveChat option on our website and we can, of course, be contacted via our email, we're also on the end of the phone too! Read more on how to contact us here >
Want to write for us?
If you've got experience with producing content on photo, video and/or optics products or techniques then we would love to hear from you. Contact our blog editor, Fee, with a sample of your work at [email protected].
- By Beatrice Debney
- 6 Aug 2021


