


Vaonis Vespera: Easy Astro Anywhere
If you are new to astronomy or a keen visual astronomer, and thinking of starting a hobby of astrophotography, it’s very easy to get overwhelmed with the amount of equipment you realise you might need, what the right equipment is and how on earth do you get it all to work together.
There is a steep learning curve. The internet has a wealth of information to answer all the questions you might have but it takes a lot of dedication and good weather to understand what’s what. Unfortunately, this puts a lot of people off from exploring more of the night sky, but when you do figure everything out it’s hard to stop taking pictures.
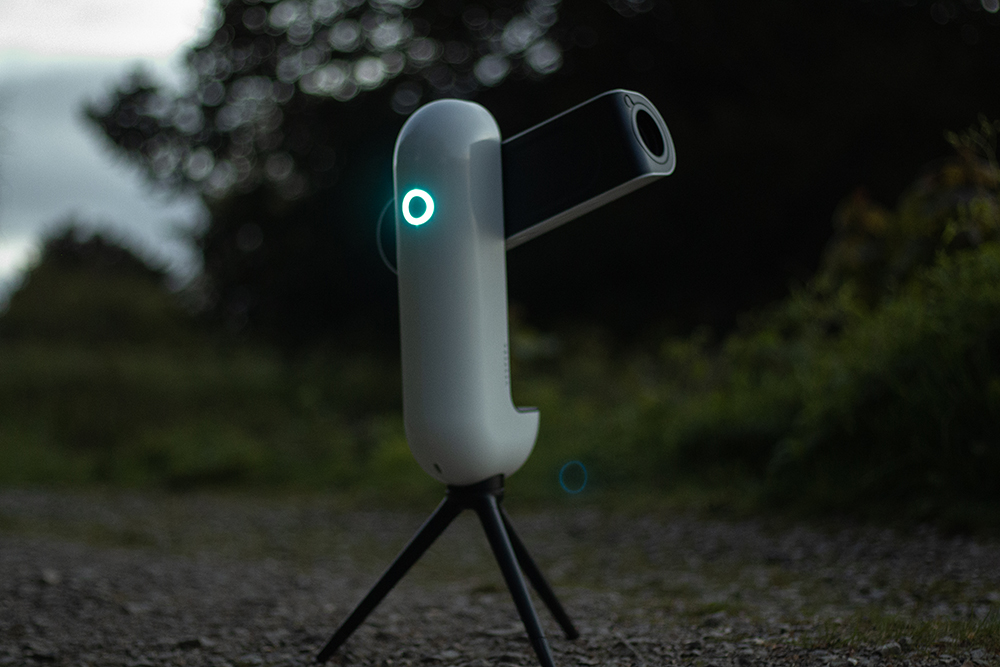
The Vaonis Vespera Observation Station removes all of these complications and lets you effortlessly explore the stars with your phone acting like a digital eyepiece, opening up all the faint objects that you can’t see with a more traditional visual astronomy setup.
What is Vespera?
Alongside the companion app ‘Singularity’, the Vespera Telescope is an all-in-one astrophotography tool - a telescope, camera, computer, star map, information hub and observation planner - and all this fits into a package small enough for you to put in a rucksack and take along with you on your next camping trip with family and friends.
Ready to go with the tap of a button
The simplicity of this system continues with setting up the device. With my other kit, I like to give myself 30/45 minutes of set up time - balance the telescope with counterweights, plug in all the camera’s batteries and computer cables, polar align the mount and finally focus the imaging camera before slewing over to the desired target.
With the Vespera, however, this is literally all done with the tap of a button on your phone. The tripod it comes with is essentially a tabletop tripod, holding the telescope a foot or so off the ground, this does the job and they offer larger legs separately.
For my tests, I attached it directly to a regular (but very sturdy) tripod via the larger tripod thread which worked great. Being higher off the ground simply gave me more clearance to see over trees and garden fences.
You can argue that being low to the ground introduces turbulent air in front of the lens but considering the focal length and resolution of the final images I’m not sure how much this would actually affect the picture.
Nebulae and stars: Automatic object location
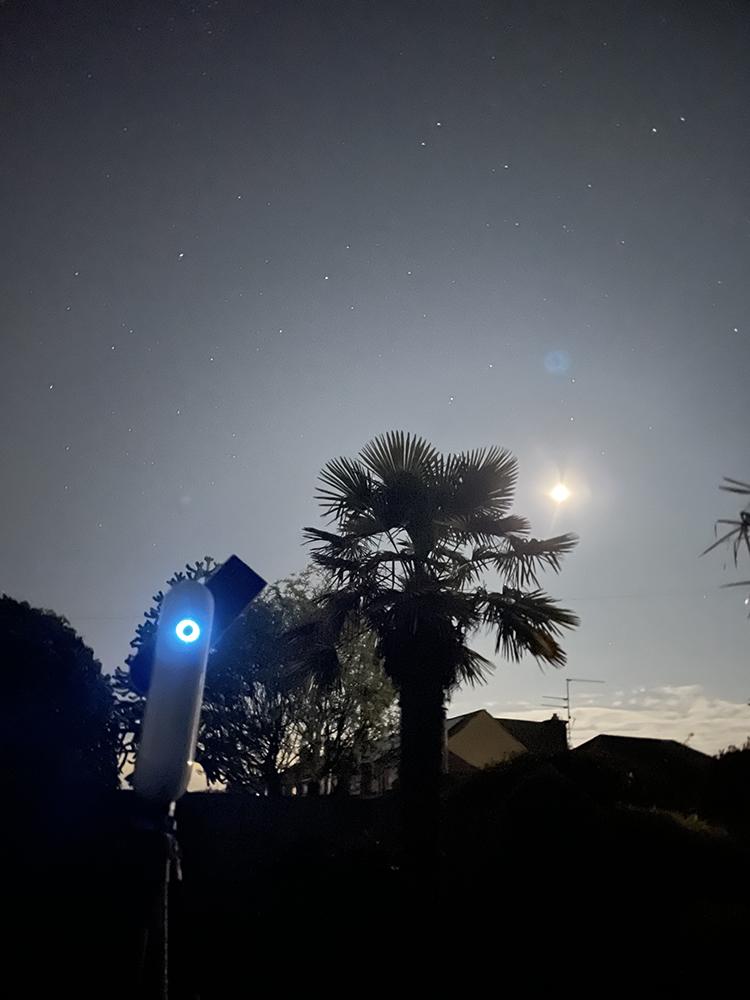
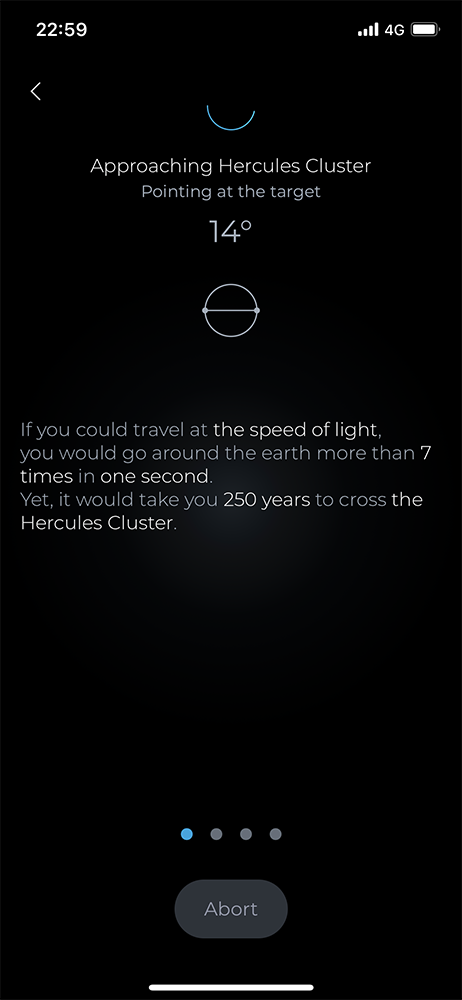
After placing the Vespera on the ground and switching it on, you connect to its WiFi signal from your phone or tablet and simply press ‘initialise’. You then watch it open up and figure out where it is looking and focus automatically.
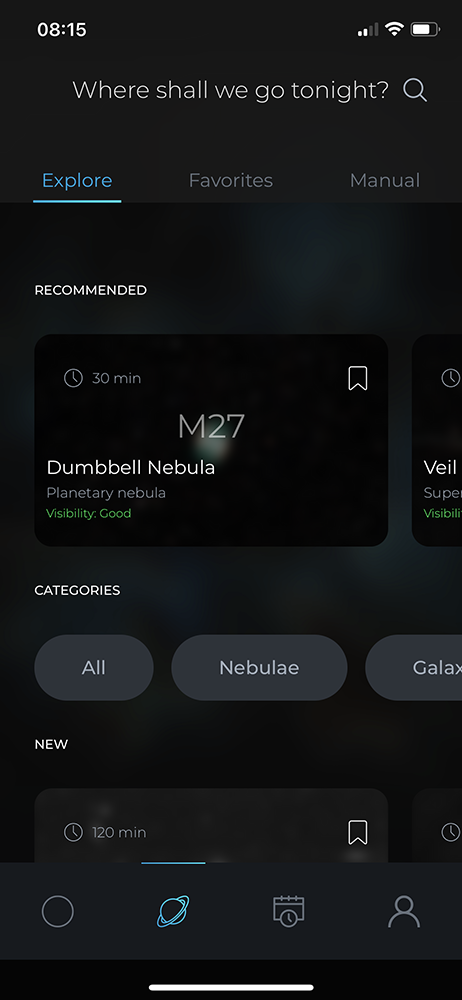
You are then treated to scrolling through a list of recommended objects currently visible in the sky ranked through visibility rating and object type such as Galaxies or Nebulae, along with recommended exposure/viewing time for each. In general, longer total exposures give best results but as this operates with an ‘alt-az’ mount there are other factors to consider mentioned later on.

Watch live as it stacks
Once you choose a target it starts taking 10-second exposures, and stacks these ‘sub-exposures’ live on your phone as it continues on. After a few minutes, you can scroll through the previous iterations of the image to see how much brighter and more detailed the image becomes, a really great way to start understanding the process of exposure stacking.
Once the exposure is finished, you can save the final image as it is, export the TIFF file (which then needs ‘stretching’ or editing to bring out the exposure and details) or when back inside you can transfer all the individual image files directly to a computer to manually process the image if you so desire.
Editing your images
I really recommend this as there is so much to learn about why this process is usually quite extensive, and about how to edit these types of images properly. This resulted, in my case, in a much better final image as I found the automatic edit the Vespera did to be very aggressive towards the background noise control and lost a lot of the colour in the galaxies.
Although considering I was imaging with a nearly full moon high in the sky I am amazed at how much detail it did pick up. What I enjoyed most using this for a couple of nights is that I could jump around multiple targets in one night and really explore where everything is in relation to each other, rather than focusing on just getting the best image I can of one object.
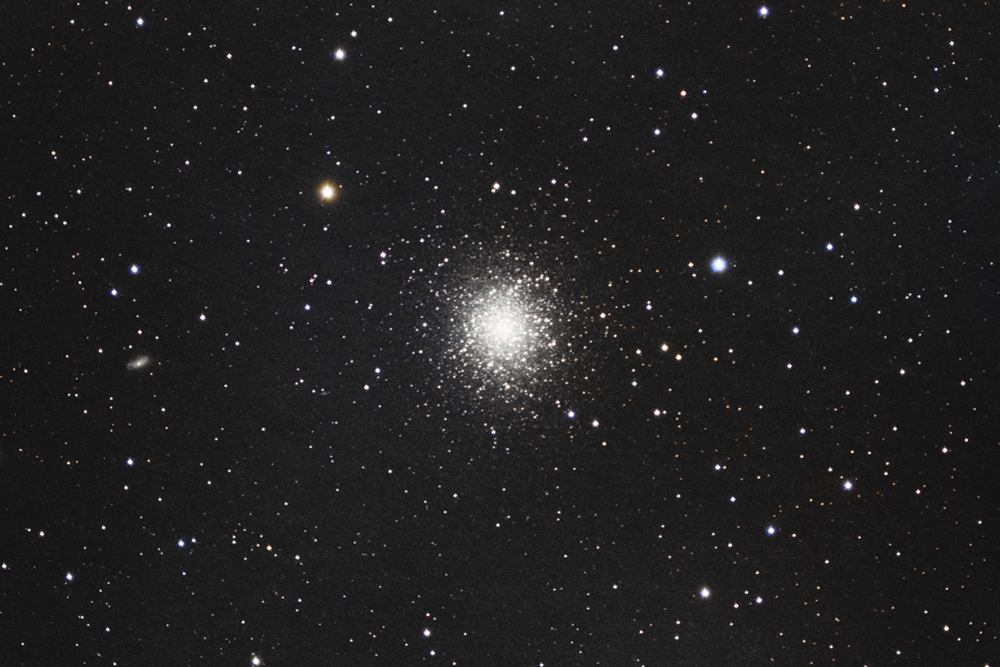
Matt Bruce Edit M31
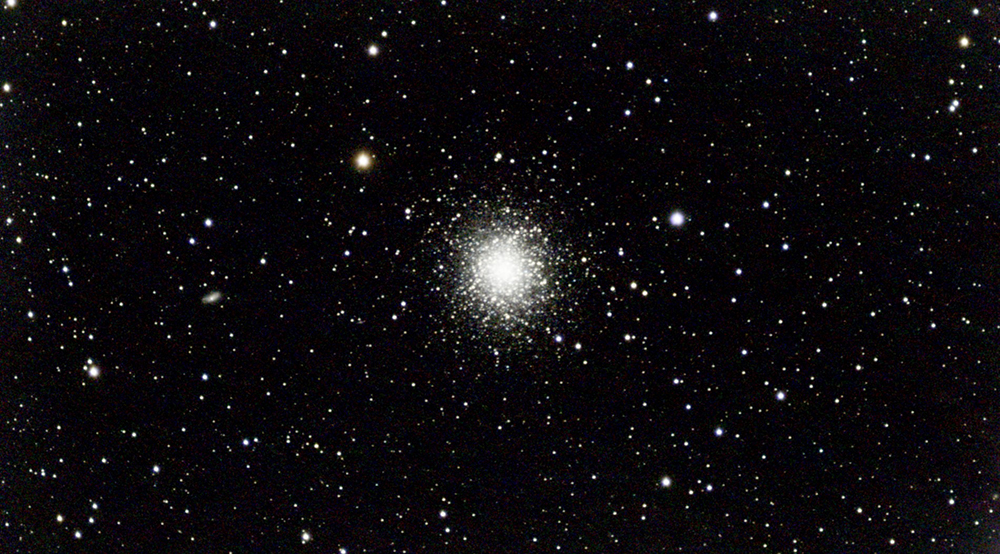
AutoStack from Vespera M31
Tracking galaxies
I photographed M81 and M82 galaxies as my longer total exposure test to see how clean of an image I could produce. This data is a good example of showing how the Vespera operates and tracks the earth/sky motion.
There are two types of mounts that you can put a telescope onto: ‘Alt-Az’ and ‘Equatorial’. Alt-Az moves across altitude and azimuth axis (up, down, left and right), this is much more intuitive and easy to manually point to a subject. As such, it is a useful design for visual astronomy.
An Equatorial or ‘EQ’ mount is oriented to point towards one of the celestial poles - the point at which all the stars appear to rotate in the sky. This is means there are important steps to setting up equipment correctly - if done incorrectly you won’t be able to track objects properly.
While this is initially more complicated it simplifies later steps when used for astrophotography. The apparent motion of stars is the Earths rotation. When tracking an object in the sky, an EQ mount will follow its trajectory perfectly by moving only one axis as they both rotate around the celestial pole.
Because an Alt-Az mount does not rotate around the celestial poles, when tracking an object for a long period of time it will appear to rotate in the view of the eyepiece or camera. So when photographing objects, the camera also needs to rotate - meaning now 3 motors are needed to track an object rather than just one. This can be difficult to do accurately at consumer-level prices for 3 motors.
The Vespera achieves a great middle-ground of not needing to track the rotation of the image accurately simply by taking multiple 10-second exposures instead of fewer longer exposures upwards of 4 minutes. The video clip is every single 10-second image across the total exposure time of about 2 hours. In this you can see that while the camera does rotate, it is not a continuous motion, but a series of small steps and corrections between every few images.
Capturing bright images
The usual drawback to this style of imaging is that very faint subjects need more exposure time so that structures don’t get lost in the general background noise of the sensor, and therefore lost in the image stacking process.
This is where the target user/use case becomes clear. You can certainly take beautiful images and observe objects impossible to see with the human eye, but it is not supposed to compete with higher-end, more complex and often far more expensive imaging systems.
Something to note is that as the camera is not rotated the exact same as the subject (so the longer the total exposure time) the more you have to crop into the final image to remove the corners that don't get photographed as much as the centre of the frame. This does reduce your overall file size, however, the image produced is still more than good enough to view on screens such as a laptop and phone.
Live stacking vs manual stacking
What I didn't anticipate with this method of imaging is file management and processing time. If you do manually stack and edit the images (which I recommend if you want to learn more about the process and squeeze the most image quality and detail out of the Vespera possible) then you should note that more files mean much longer processing times in each pre-processing step.
A very minor issue but as I have never had more than 50-60 images to stack in one go, the 700-plus images I had for M81 and M82 really highlighted where my computer is slow.
Fortunately, the Vespera is clever and powerful enough to live stack the images as they come through on your phone or tablet. So if you just want to sit back and enjoy a night of clear sky's and discover the beauty and spectacle of space, then the only thing you need to do is press the start button. I am still amazed at how quick and easy the Verspera is to set down and see a final result.
Watch as the stars appear before your eyes
Seeing the image slowly come to life in front of you is fantastic - especially if you haven’t seen the object yourself before, even dim objects like these galaxies were visible after only a few minutes.
For bright objects such as M31, a large cluster of stars, the auto stack and edit looks really great, and for viewing on a phone it is certainly impressive - considering this is only 30 minutes of total exposure and does not seem to use calibration frames which reduce the background noise of the camera sensor.
Manually editing your images
On a closer, and quite critical look at the images, you can start to see that the automatic edit is very aggressive with noise reduction which then clips the gentle shine from stars, and tends to over-expose bright regions such as large stars and in my case the centre of the galaxies, resulting in a lack of colour.
This is where editing the images yourself really allows you to take advantage of what the Vespera can capture. Other than adjusting individual colour channels to highlight the colours in the galaxies, I only did a minimal edit.
This consisted of a much more gentle stretch which brings out the dim structures and, depending on the total exposure time, a small noise reduction and sharpen - more noise reduction for the shorter exposure time as the more individual images you stack together, the less background noise the image naturally has.
With these simple and relatively quick edits, you can see how good the Vespera is at capturing these objects, even in as little as 30 minutes of exposure.
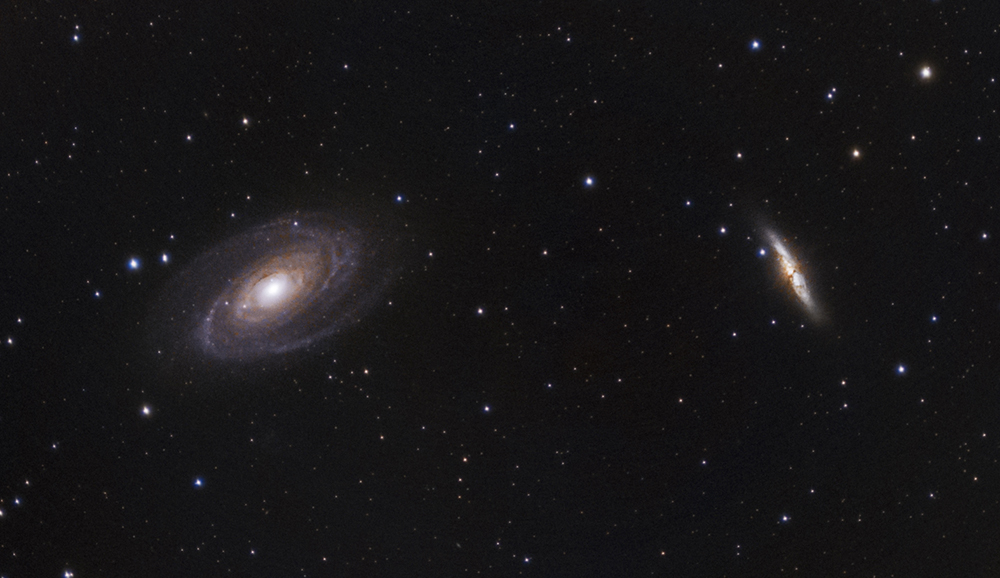
Matt Bruce Edit M81_M82
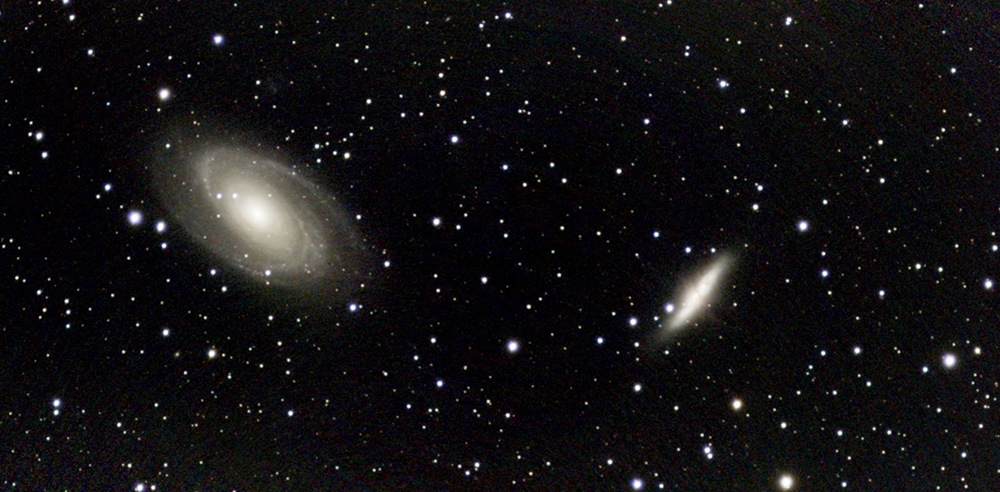
AutoStack from Vespera M81_M82
Who is the Vaonis Vespera Observation Station for?
From my time using the Vaonis Vespera, it is clear to see who this all-in-one ‘observation station’ is aimed at and its ideal use case. It is a fantastic tool for all ages to learn about the night sky, opening up the ability to observe very faint objects that cannot be seen through a visual telescope with an eyepiece.
If you want to dip your toes into the world of astrophotography but have no idea where to start with equipment and information, this device has everything you need to produce images and begin your journey learning this endlessly fascinating hobby.
Without a device like this, the learning curve of this endeavour is extremely steep. It is also generally a very expensive hobby. While you can certainly build your own rig for a relatively reasonable price, knowing what equipment you actually need and what works with each other is another mission in itself.
The ability to buy one device, that you can place down anywhere, and start taking images within minutes at the push of a single button, all within a package that you can fit in a backpack is fantastic and a great option for those who want to travel around and discover what's in the night sky.
Convinced yet?
You can view more and purchase the Vaonis Vespera Observation Station here >
About Matt Bruce
Matt Bruce is a Brighton-based photographer and visual artist who explores a wide range of topics, many of which circle around the fascination of astrophotography. He often uses unique materials from various photographic techniques to computer-based 3D imaging to create provoking and spectacular imagery.
You can see more of his work on Instagram @matt.bruce.p
Read next
- Beginner's Guide to Astrophotography: Capturing the Night Sky on Camera
- The Beginners Guide to Buying a Telescope | Astronomy Guide
- The Essential Astronomy Glossary
Thank you!
Thanks for taking the time to read our blog, we really do hope they help you out and answer some of your questions. If you still have some unanswered, then please feel free to get in touch with our team of experts.
We have a LiveChat option on our website and we can, of course, be contacted via our email, we're also on the end of the phone too! Read more on how to contact us here >
Want to write for us?
If you've got experience with producing content on photo, video and/or optics products or techniques then we would love to hear from you. Contact our blog editor, Bea, with a sample of your work at [email protected].
- By Matt Bruce
- 26 May 2023


