


PhoneSkope Digiscoping System
How many birders carry a smartphone these days? I don’t know the answer to this myself but I am happy to go with an estimate of somewhere between pretty much all of us and…er…all of us.
And why wouldn’t we? A smartphone brings all manner of benefits: a multitude of apps that let us do anything from identifying bird calls to ordering a pizza; the ability to communicate with others if the need arises; and, of course, the ability to capture images and record video footage of anything we see.
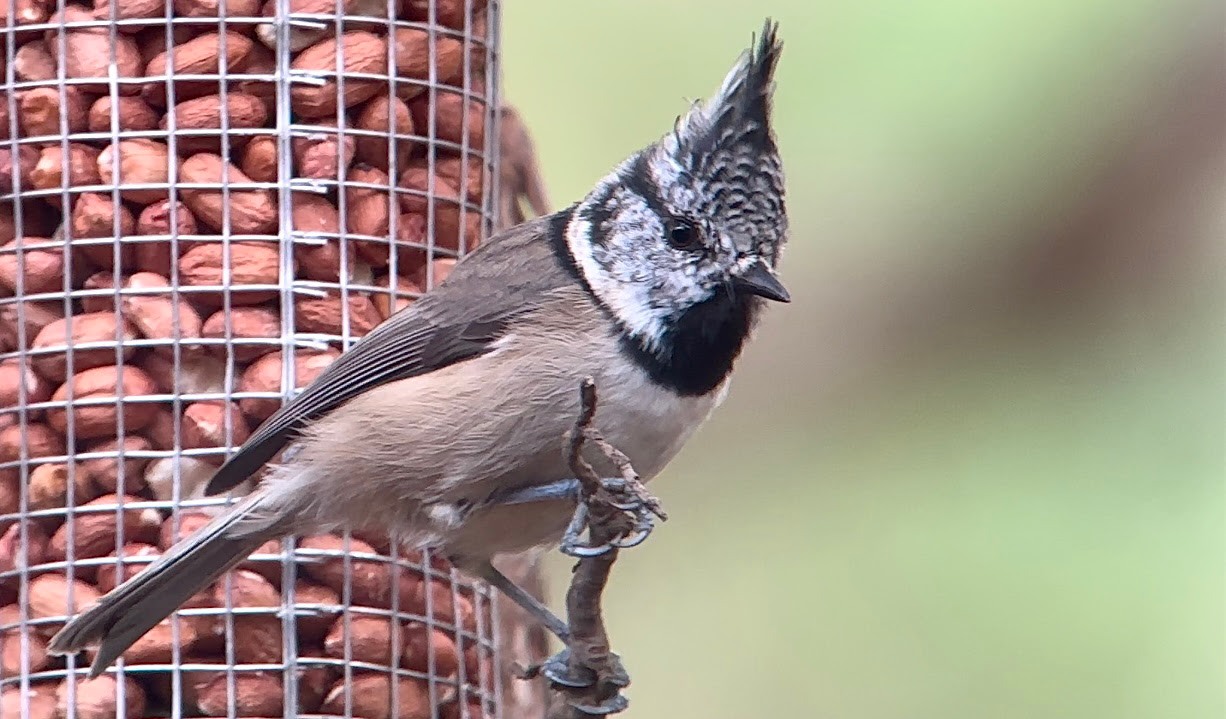
The photographic capabilities of your average smartphone have improved massively over the last few years and that trend looks set to continue so, for us birders, there’s never been a better time to link a phone to an optical device and start recording what we see. Like this ‘Wee Crestie', for example.
How long has smartphone digiscoping been around?
We can’t be too sure as to precisely when phonescope digiscoping started but we can certainly hypothesise. I think it’s likely that somewhere back in the mists of time, some bright spark must have held their smartphone up to the eyepiece of their chosen optic and discovered that a magnified image was possible – the birth of phonescoping!
We can also postulate that the resulting image probably wasn’t the sharpest or steadiest but it would have been an image nonetheless; and one that hinted at things to come.
In order to progress these shaky results from the digiscoping primordial soup, however, something else was required. And that ‘something’ duly emerged in the form of the phonescoping adapter.
Quite a few phonescoping adapters, in fact, as there is now a plethora of such products on the market, all promising to be the fastest/easiest/most hassle-free way of attaching your phone to your trusty optic.
Why do I need a digiscoping adapter?
The clear advantage of using an adapter (as opposed to trying to go handheld) is that it will help to hold your smartphone attached securely and, as long as everything is properly aligned, should allow the user to capture some nice visual souvenirs of the birding day.
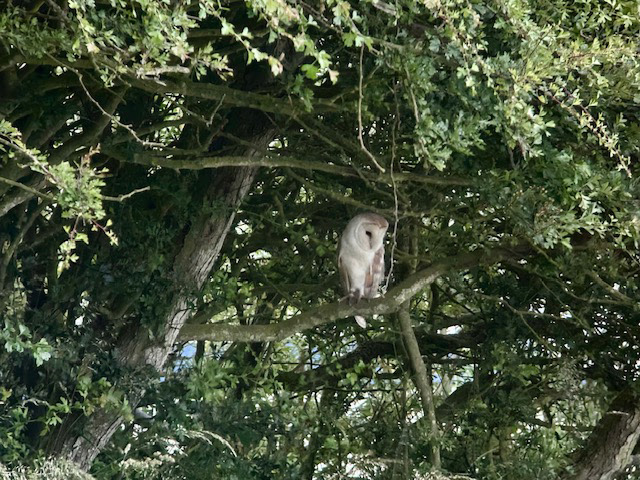
This Barn Owl, for example, was captured with my PhoneSkope adapter from inside my (t)rusty vehicle on a very dull evening. What isn’t immediately obvious is that it was raining heavily at the time, too. OK, the image won’t win any prizes but, bearing in mind the conditions and also that all I had to hand was my spotting scope and smartphone, I reckon that I came away with a nice visual souvenir of that evening: something to bring back memories of bird, time and place.
What is the best smartphone digiscope adapter?
So, having decided that you’d like to try digiscoping with your smartphone and spotting scope (and why wouldn’t you?!) you then have to settle on which adapter to choose.
On the face of it, that decision isn’t quite as simple as it used to be due to the aforementioned proliferation of phonescoping adapters which are now available. These can broadly be divided into two types: universal and dedicated. A universal adapter has a range of adjustments so that it can be made to fit most phones whereas a dedicated adapter is made to fit a specific smartphone model…but which is best?
Inevitably, there are pros and cons to both. With a universal adapter, the main advantage is that you don’t have to buy another adapter when you change your phone. The main disadvantage is that some universal adapters can be slightly fiddly and time-consuming when it comes to attaching to your optic with perfect alignment.
And this is important: if your adapter isn’t aligned perfectly it’s likely to lead to shadowing or vignetting at the corners of the image and some subjects are unlikely to stay where they are for very long so you risk missing the shot entirely if you end up having to grapple with your phone and adapter in order to get everything aligned quickly enough.
The obvious caveat with a dedicated adapter is that you’ll probably have to change your adapter if/when you change your phone. The advantage (which is a big deal, in my view) is that a dedicated adapter has been designed to give you perfect alignment, quickly, every time. I’ve already made reference to my PhoneSkope digiscoping adapter and that’s what we’ll be looking at here.
Who is PhoneSkope?
Based in the USA (Utah, to be exact), PhoneSkope (note spelling, not phonescope!) specialises in dedicated digiscoping adapters (although they do offer a universal option known as the Lollipop) and in this blog post, I’ll be reporting on my own experiences with my very own PhoneSkope phone case and adapter ring.
All images were captured with my rapidly ageing 62mm Leica spotting scope, iPhone 14 Pro and PhoneSkope setup with the exception of this Song Thrush video: recorded with the same scope but I used my previous phone, iPhone XR, with the relevant phone-specific PhoneSkope case. I thought it was worth including just to illustrate that you don’t need the most up-to-date smartphone to get nice results:
Before we dive deep here’s some background about PhoneSkope. The company has been around for a few years now and is one of comparatively very few optics-related suppliers actually manufacturing their products in the USA.
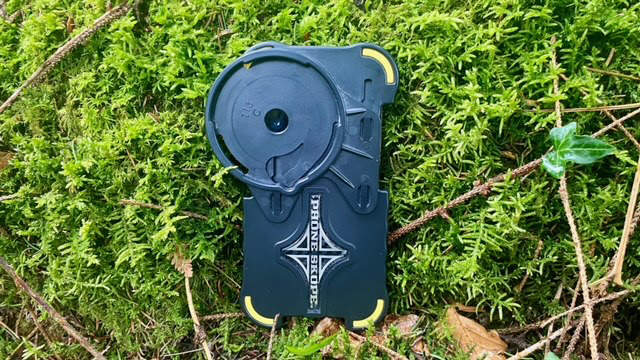
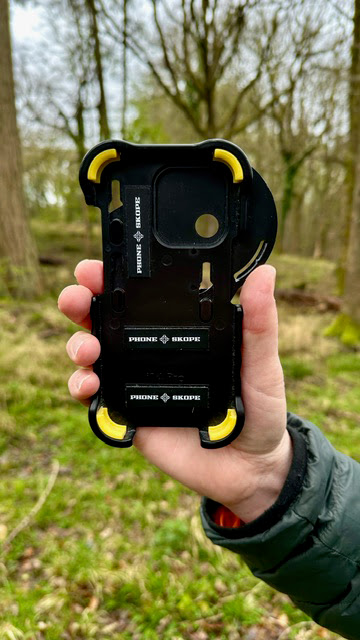
They produce dedicated phonescoping cases for pretty much all iPhone and Samsung Galaxy models. Each case is made of what is described as shockproof, thermo-polymer ABS and comes in the company’s distinctive black and yellow livery.
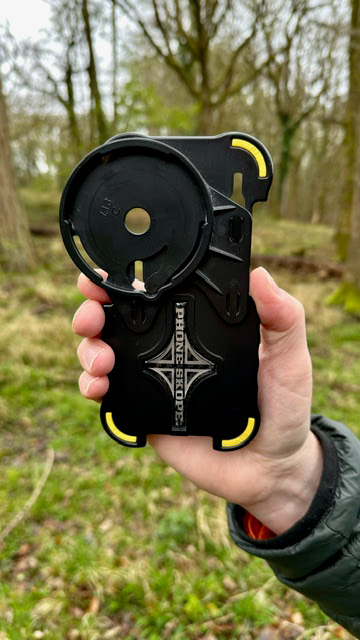
PhoneSkope Design
Each case has non-marking memory foam pads in each corner and HD rubber bumpers which are designed to give extra protection if you happen to drop your phone. A week after getting my brand new iPhone 14 Pro I dropped it from a height of five feet onto gravel. The phone was cocooned within its PhoneSkope case at the time and I can confirm that it survived completely unscathed.
Probably worth mentioning that the bumpers mean that the phone kind of ‘floats’ within the case which undoubtedly helps avoid scratches when putting the phone in or removing it…eight months down the line my phone still looks as good as new (despite the tumble) so that’s reassuring and confirms that PhoneSkope’s cases offer a significant degree of protection
How to use a PhoneSkope
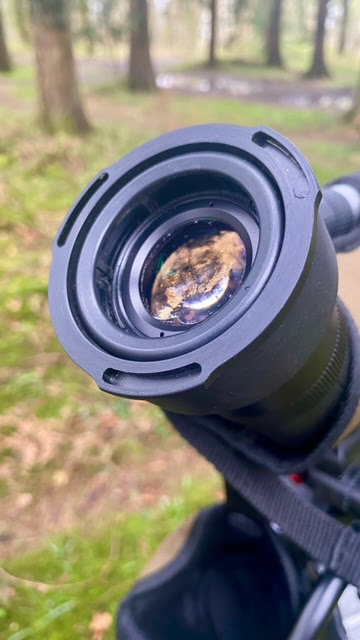
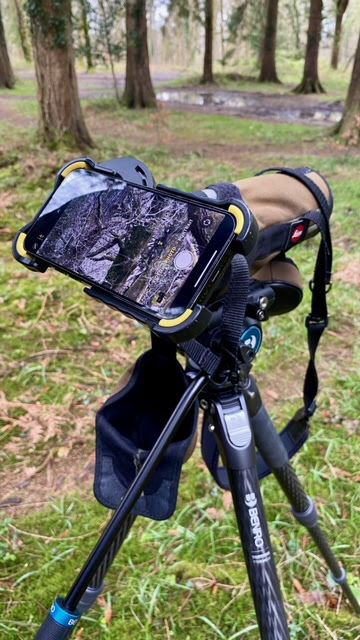
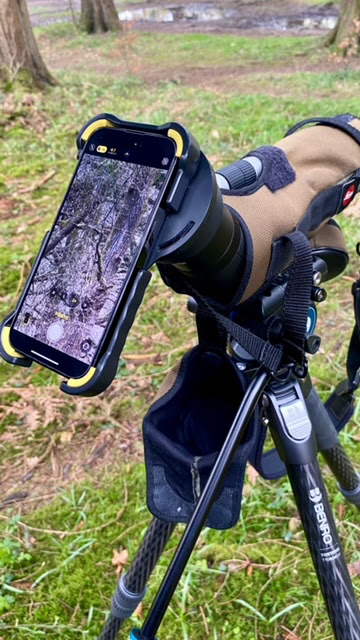
In order to start digiscoping with your spotting scope and smartphone you’ll need two PhoneSkope products. We’ve already covered the dedicated phone case; additionally, you’ll need a C-3 adapter. This is a plastic ring adapter which will be specific to your spotting scope eyepiece and will serve to link your PhoneSkope case (containing your phone) and optic together.
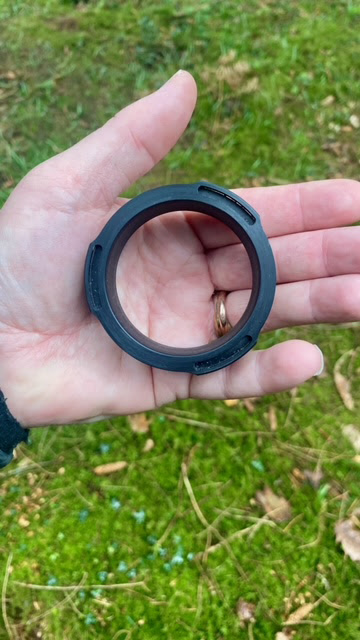
The C-3 simply pushes onto the eyepiece of your optic and, once it’s on there, I would heartily recommend leaving it in situ. In fact, I’d even go as far as to say that doing so is key to the effectiveness of the PhoneSkope system. In my experience, it has absolutely no effect on the viewing experience (to the point that I forget it’s there) and just makes it incredibly quick and easy to attach and detach your phone. And when I say ‘quick’ I mean really quick!
And of course, as the case lines up precisely with your phone’s camera lenses, alignment is spot-on every time. For me, speed of setup and accurate alignment are the most important factors when assessing the effectiveness of any digiscoping setup and the PhoneSkope is just killer in this regard.
Do PhoneSkope adapters cover multi-lens phones?
I said ‘camera lenses’ there, didn’t I? These days, most smartphones sport more than one camera lens and the benefits of being able to choose which lens to use when digiscoping are huge. I’m glad to report that PhoneSkope’s dedicated adapters allow the user to switch between lenses.
This is accomplished by means of the large, plastic disc which marries PhoneSkope adapter and C-3 Adapter together. With the iPhone 14 Pro case, the lower position allows the user to use the 1x/2x camera. Slide the disc upwards and you’re then ready to use the 3x. There is no facility to use the extra-wide lens as it’s too wide for effective digiscoping: too much vignetting.
I tend to favour the 1x/2x most of the time but this Dipper footage was captured using the 3x and gives you an idea of what it can do:
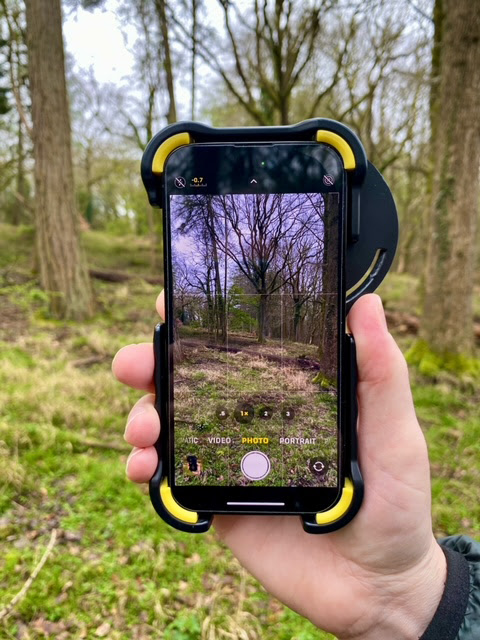
Here’s a couple of photos showing my setup ready to use with the 1x/2x camera on my iPhone 14 Pro. As you can see, it’s possible to use in either landscape or portrait mode. I tend to go with landscape most of the time but it’s useful to know that portrait mode is still an option if required. In order to switch from one to the other it’s simply a matter of rotating the C-3 on the eyepiece so good to have that versatility.
Can the PhoneSkope be used as a phone case?
It’s also worth mentioning that you can remove the sliding disc completely if required. This allows you to use your PhoneSkope as an everyday phone case. And a very robust (and rather eye-catching) one it is, too!
What to use the PhoneSkope for?
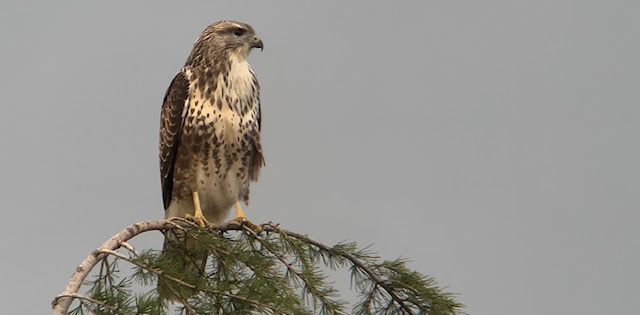
I tend towards recording video footage more than stills as I like to look back on a sort of ‘living diary’ of a day in the field. Of course, one of the beauties of digiscoped video capture is that you can then go through and extract individual frames. A good example would be this Common Buzzard, phonescoped from my garden. The still was extracted from the video:
And of course, phonescoping works with mammals, too. One of my favourite species here, the Brown Hare:


The PhoneSkope App
Before I forget, PhoneSkope produces a free app which is well worth downloading. The app works alongside the native camera software and, to my eye, gives a slightly different image in terms of colour rendition. I tend to prefer the native smartphone software most of the time but the PhoneSkope app works very well under certain conditions. These Puffin images, captured using said app in very bright conditions, for example:


An accessory that speaks for itself
I think this is one of those blog posts where images speak louder than words so I hope the various images and video grabs have illustrated what the PhoneSkope is all about and what it brings to your birding day.
I own several smartphone adapters and they’re all capable of giving nice results but the PhoneSkope setup is now the one I use pretty much exclusively. The sheer speed and ease of setup is a huge advantage when you’re trying to capture stills or video of a bird (or any other creature) that isn’t likely to stay in one place for very long and, for me, that’s the deciding factor.
An example of that would be this Treecreeper, shot on the 2x camera. I spotted a flicker of movement out of the corner of my eye and the PhoneSkope’s speed of setup allowed me to grab some footage before the bird continued on its upward travels.
Looking through branches so not perfect but this is a very small, fairly rapidly moving bird and I’ve always liked this footage as a visual souvenir of a really nice woodland birding sortie. Check out the scratch/stretch partway through.
On top of that, having the ability to switch quickly and easily between phone cameras depending on the distance and size of the subject is the icing on the digiscoping cake. Part of the beauty of the PhoneSkope system is the sheer simplicity of it all. The case aligns your phone’s camera lenses up perfectly every time, it then connects to the C-3 in about two seconds (if that) and the C-3 stays on your eyepiece ready for action whilst not affecting your viewing experience in any way, shape or form.
In my view, this is a BRILLIANT product which has become as much an integral part of my birding kit as the bins, spotting scope and tripod I mentioned way back at the start. The system may only consist of two small black and yellow pieces of polymer but if ever a product set out to do exactly what it’s designed to do with aplomb it has to be this! As someone famous once said, don’t leave home without it!
I hope you’ve found this introduction to the PhoneSkope digiscoping system useful and informative. Hopefully, the sample photos and video clips help to illustrate the type of results you can expect from phonescope digiscoping with this setup.
Everything you see on here was achieved with an increasingly elderly 62mm spotting scope; any of the current crop of large objective premium optics would be likely to give better results. When you then throw in the likely advances in phone camera technology it’s hard not to get excited about the sheer potential that phonescoping offers.
As always, please contact us with any queries but for now, just like this Spinus spinus, gotta fly.
Convinced yet?
Grab your PhoneSkope Case for iPhone or Samsung smartphones and get digiscoping today!
Read next
- PhoneSkope | How to shoot photos and video with your telescope and mobile
- Zeiss Conquest Gavia 30-60x85mm Spotting Scope Review
- Ultimate Smartoscope Vario-Adapter Review
Or you can watch our video review on YouTube
Thank you!
Thanks for taking the time to read our blog, we really do hope they help you out and answer some of your questions. If you still have some unanswered, then please feel free to get in touch with our team of experts.
We have a LiveChat option on our website and we can, of course, be contacted via our email, we're also on the end of the phone too! Read more on how to contact us here >
Want to write for us?
If you've got experience with producing content on photo, video and/or optics products or techniques then we would love to hear from you. Contact our blog editor, Bea, with a sample of your work at [email protected].
- By Martin Drew
- 15 Apr 2024


