


Level Up Your Live Stream – One Stop Shop for the Best Live Stream Set Up
Whether you’re streaming the latest AAA release on Twitch, teaching an online course, or broadcasting a church service, there are a great number of reasons why you might be looking for an upgrade from your grainy, laptop webcam. Thankfully, there are some fantastic options out there, some of which you may already have!
Whilst upgrading your camera is the obvious first step, there are also a number of other things you can do to improve the quality of your live streams. From audio, to lighting, to the software you use, we’ll take a look at what makes the best live stream set up.
Before we get as far as loading up our shopping baskets with the latest mirrorless cameras and professional audio equipment, however, there are three main factors that you need to consider:
Your budget - How much are you looking to spend?
Your skills - How simple or complex do you need the set-up to be?
Your content - What are you streaming? Do you need multiple angles? Do you have any specific technical requirements?
Once you have established all three of these criteria you can start to look into great ways to level up your live stream.
Cameras
Since high-quality video is what we’re here for it’s safe to say that the camera is probably the centrepiece of your live-streaming set-up. Whilst the built-in webcams on modern laptops are getting better and better, they are still no replacement for a dedicated camera, whether this is an external USB webcam, or your own mirrorless or DSLR camera. Plus, for streaming events, using the built-in webcam may not even be an option to start with.
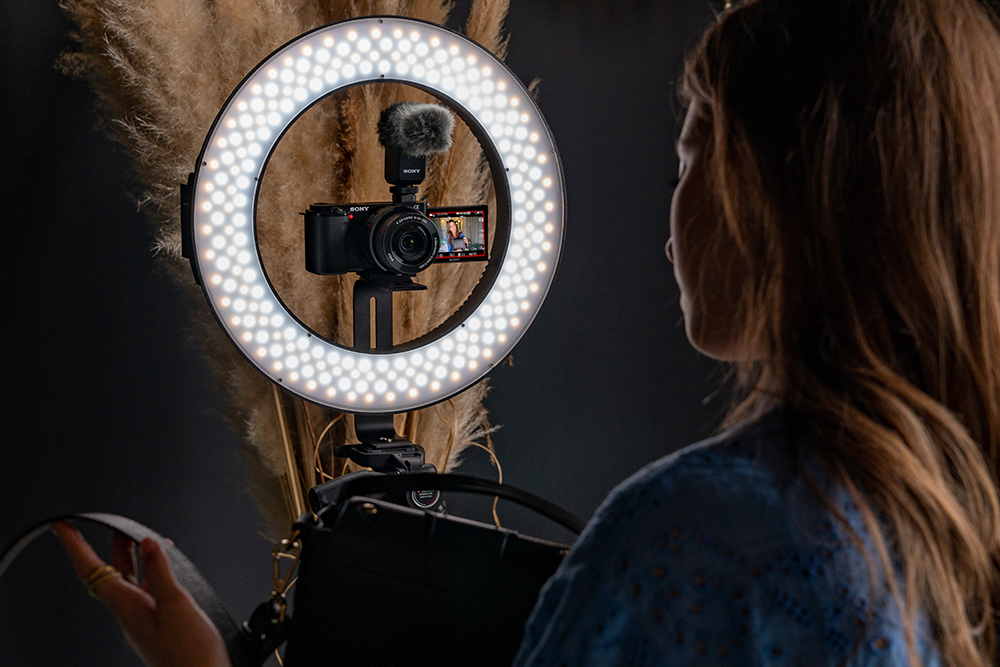
The Plug and Play Option
The Sony ZV-E10 is a compact 4K mirrorless camera that is designed for vlogging. With its small size, lightweight design and 4K video capabilities, it’s easy to see why it is so popular with content creators. The main reason for considering this camera is that Sony has designed it with live streaming in mind. The camera plugs directly into your PC or Mac (as well as some Sony Smartphones) and can be used just like a webcam.
The setup of this camera is surprisingly simple. Once you have enabled the streaming functions in the camera settings and installed the Imaging Edge Webcam software, you simply plug the camera into your computer and it is automatically detected as a webcam. However, you will need to enable these settings every time you use it for streaming. Though these can be mapped to a function button for easy setup.
Instructions for setting up the camera can be found here >
When streaming the resolution is limited to 720p, a step down from the 4K resolution the camera is capable of normally. Having said that, it is still a considerable improvement over the 720p webcam on my 2019 Macbook Pro. This is likely mostly to do with the larger APS-C sensor and 16-50mm power zoom lens.
One thing I really like about this camera is that it is also powered by the USB-C cable used to connect it to a computer, so there’s no need to worry about running out of battery. Though I would recommend purchasing a longer cable, such as this one here. The included cable is far too short unless the camera is being used directly next to the computer.
Whilst the audio straight out of the camera is decidedly average, Sony does include a windshield, which is a nice touch. I tested the camera with the built-in mic, a lav mic, a shotgun mic and a condenser mic. I was able to achieve the best audio quality with the condenser mic, which was plugged directly into my PC, bypassing the camera.
Pros
|
Cons
|
Difficulty - 2/5
Quality - 3/5
Price - 3/5
Best for - Anyone looking for a quick and simple camera to set up, or where space is at a premium.
Not great for - If you need a 1080p or 4k input for your stream.
What do I need with it? - An external mic and a longer USB-C cable.
For The Serious Streamers
If you’re looking for a solution which will allow you to have more control over the camera settings and the look of your stream, then your existing mirrorless or DSLR camera may be the ideal solution.
As might be expected, with a greater degree of control, also comes a greater level of complexity. Whilst for some streaming platforms you only require the camera manufacturer's webcam software, for others, you will require a free software package called OBS.
OBS, or Open Broadcast Software, acts as a go-between for your camera and the streaming platform. The best way to describe it is as a virtual switchboard, which combines multiple feeds (camera, screen share, graphics, etc) and outputs them as a single feed to your streaming platform. It also allows you to connect your camera to streaming platforms that it otherwise wouldn’t be compatible with. For other cameras, you may require additional hardware if no tethering software is available from the manufacturer.
Here I’m going to be using Panasonic's Lumix Tether software and a GH5, as it is a good example of the limitations of the tethering software, and where you might want to use OBS.
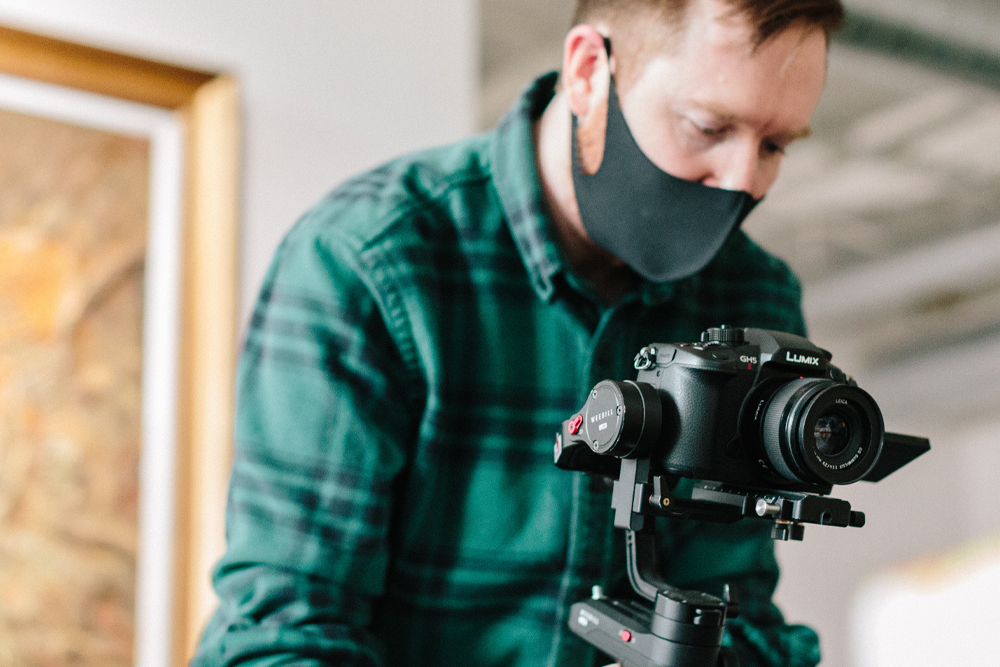
The Lumix Tether software is compatible with most current GH and S series Lumix cameras, such as the GH6, S5 and S1. It offers excellent control over the camera, with access to all of my GH5s settings through the PC and Mac apps. The live view option allows you to get a full-screen preview of how your stream is going to look.
During testing, I found that Google Meet, Zoom, and Twitch automatically detected the camera, without the need for OBS. However, Discord required the use of OBS as a virtual webcam to detect the camera. I have been unable to get the built-in windows camera app to detect my GH5.
As with the Sony ZV-E10, there was some set-up to do in the camera first, however, this was also pretty simple. Following the advice on Panasonic’s website, I switched the camera to autofocus and set it to creative movie mode. When plugging the camera into a computer with the included USB cable, three options will appear on the camera screen. You will need to select PC tether.
Even when streaming, you still have full manual control over the camera. This includes shutter speed, ISO, aperture and even colour profile (Technically you could stream in V-LOG if you really wanted to).
As for the quality of the stream, whilst the GH5 is capable of shooting 4K, the limiting factor is going to be your streaming platform and broadband connection. On my PC, connected to wifi, Twitch recommended streaming in 720p with a frame rate between 30-60 fps (depending on strength of the internet connection) to avoid buffering. However, on a strong connection, you could stream in 1080p at 60fps. This would be a noticeable step up from the ZV-E10.
For instructions on how to set up your mirrorless camera for live streaming, click here >
Pros
|
Cons
|
Difficulty - 3/5
Quality - 4/5
Price - 4/5
Best for - Serious or professional streamers, anyone running online courses.
Not so great for - Anyone looking for a simple budget set-up
What do I need with it? - External mic, longer USB cable and potentially OBS.
For Those On the Move
In situations where mobility is paramount, or a wired connection is impractical, you may wish to consider something like the Panasonic X1500E or X2000E camcorder.
With built-in wifi streaming capabilities, this camera is perfect for live-streaming events, such as trade shows or conferences. All you need is an internet connection (a fast and relatively stable one at that). Despite having a full-size HDMI connection, streaming is only possible over wifi. This, in my view, is a big limitation of this camera.
Whilst the wifi streaming function does offer great functionality for professionals, I wouldn't recommend this camera for most users. Due to its complicated set-up, and reliance on a strong and reliable internet connection, it doesn’t make sense when compared to the ‘plug and play’ offerings, like the Sony ZV-E10.
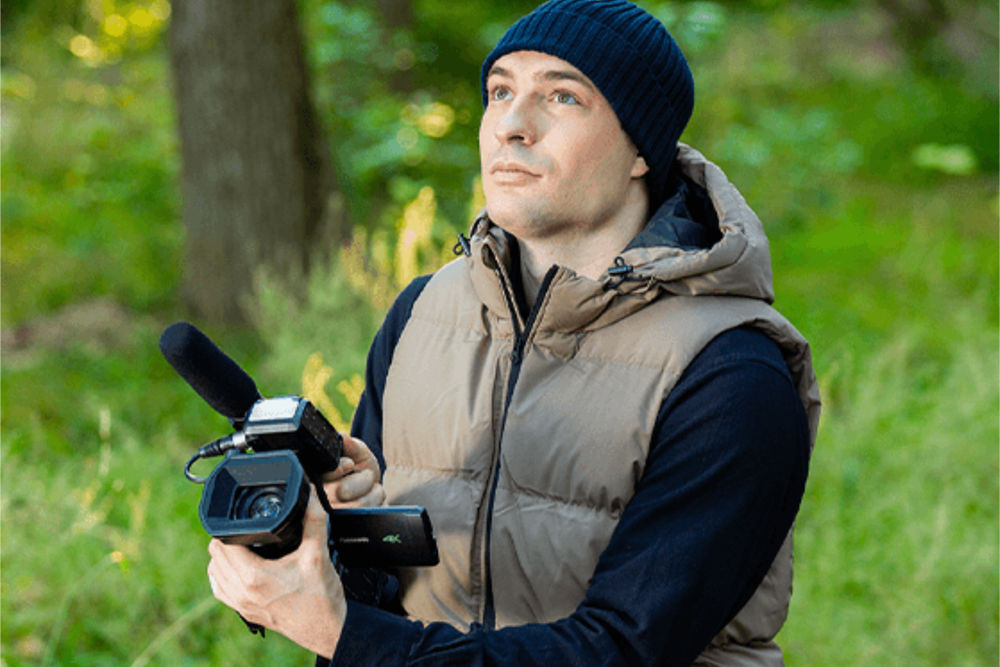
For the videographers out there who need a great quality video camera, with live streaming capabilities built in, the X1500E and X2000E are well worth considering. When I had the opportunity to get hands-on with this camera, I was very impressed by all the features which Panasonic has managed to squeeze into this surprisingly trim body. This includes compatibility with infrared lights.
Pros
|
Cons
|
Difficulty - 5/5
Quality - 4/5
Price - 4/5
Best for - Streamers on the go and event coverage
Not so great for - Anywhere without good wifi
What do I need with it? - Microphone (Is compatible with professional quality XLR microphones)
And If You can’t Sit Still?
If you can’t afford a camera crew, but still want a camera which can track your every move, then there are some more unconventional options available. A great example of this is the DJI Pocket 2.
Yet another ‘vlogging’ camera, this time from the ariel experts at DJI, who are probably best known for their drones and professional video accessories. The Pocket 2 is, as the name might suggest, a pocket-sized video camera with a built-in gimbal head. As well as being a great option for those looking to add a professional touch to their vlogs, the camera comes with DJI’s ‘Active Track’ software built in. This allows the camera to track a person or object in the frame, even as they walk across a room.
This is an excellent option for personal trainers, running classes online, or even broadcasting a lecture. Whilst it isn’t a replacement for a dedicated camera operator, it’s as close as you’re going to get for under £400.
Another camera to consider is the Insta360 Link AI Webcam. Designed specifically for live streaming, this camera is built to track a subject in the frame, using AI to assist.
Pros
|
Cons
|
Difficulty - 3/5
Quality - 3/5
Price - 3/5
Best for - Fitness classes, live performances and self-shooters
Not so great for - If you want broadcast quality
What do I need with it? - Tripod will be essential for self shooters and a microphone
What About The Pros?
If budget is less of a concern, and you want the best possible quality out there, then this might just be the best option for you. Especially if you have a multi-camera set-up.
The Atomos Ninja and Ninja V Ultra, when paired with the AtomX Cast switcher, offer broadcast-quality live switching. Offering an ideal solution for events, podcasting or any situation where multiple cameras are required. With the ability to switch between four individual camera feeds, this is a great option for content creators and professionals alike.
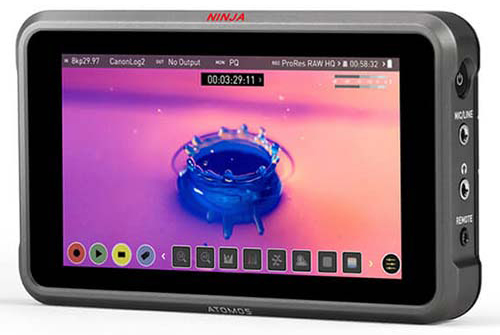
That being said, this option does require a certain level of technical knowledge to make full use of AtomX Cast’s capabilities.
This option may also be popular with those streaming events, where multiple cameras are needed to cover the unfolding action.
Pros
|
Cons
|
Difficulty - 4/5
Quality - 5/5
Price - 4.5/5
Best for - Professional and multi-camera set-ups
Not so good for - Anyone looking for a simple, ‘plug and play’ solution
What do I need with it? - High-speed HDMI cables to connect to cameras
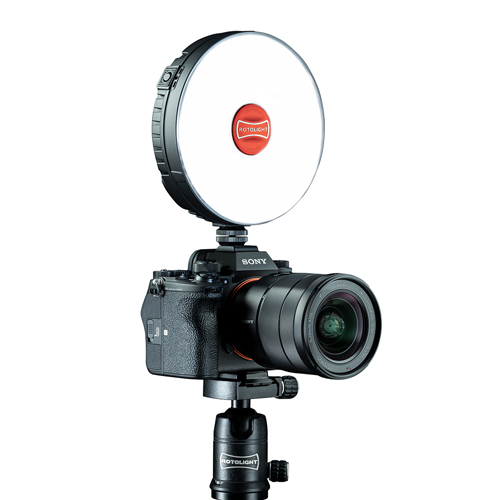
Lighting
No matter how good your ISO performance is, most cameras are useless in pitch black. Therefore, good lighting is key to getting the best possible performance from your camera, and can also help add a professional touch to your stream.
Making sure that you are streaming in a well-lit area, with a steady, consistent light source is a good start. Whilst this is best achieved with video-specific lighting, you can also use lamps and ceiling lights if you’re on a budget. Though you may need to adjust your shutter speed to avoid flickering, which isn’t ideal.
My suggestion for video lights is the Phottix Nuada S3 the Rotolight NEO 3 or a ring light if you are looking for a budget option.
Audio
Audio and video are arguably as important as each other. Making sure that you have clean, well-balanced audio which is loud enough for your audience to hear is essential for a professional live stream.
From my testing, I’ve found that there are really two main options for live-streaming audio. Lavalier mics, condenser mics and shotgun mics. Inexpensive versions of each are available, and luckily you don’t need to spend a lot of money to get good audio. The one you choose will be dependent on your situation.
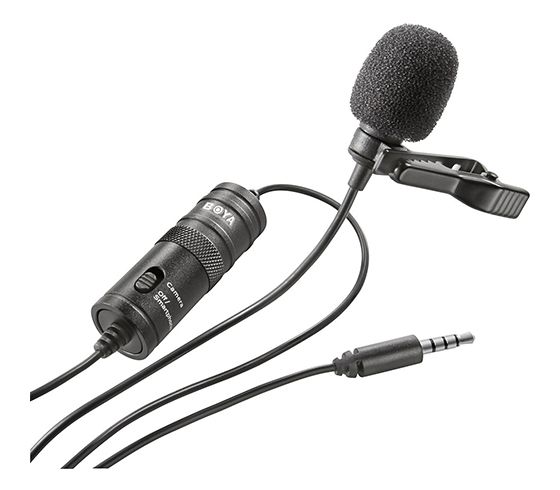
Lav mics provide great quality audio for a single subject and can plug directly into your computer or smart device via USB or a 3.5mm jack. For extra reach, extension cables are available. I’ve used the Boya By-M1 Lav mics extensively, for everything from shooting interviews to recording voiceovers, to gaming. At around £15 you can’t really go wrong with one of these. The audio quality is great for the price, and they are useful in environments with more background noise. These are ideal for interview-style streams, or anyone on a budget.
If you find yourself moving around a lot, then you may benefit from a wireless lavalier mic, such as the Rode Wireless Go II or DJI Mic. These work just like the cheaper Boya lav mics, but without the need for you to be physically attached to your computer with a wire. Ideal if you’re streaming from a gym, lecture or an event where you are moving around a lot.
That being said, with the wireless options, you do have to consider the battery life of the mics, and ensure that they don’t run out mid-stream.
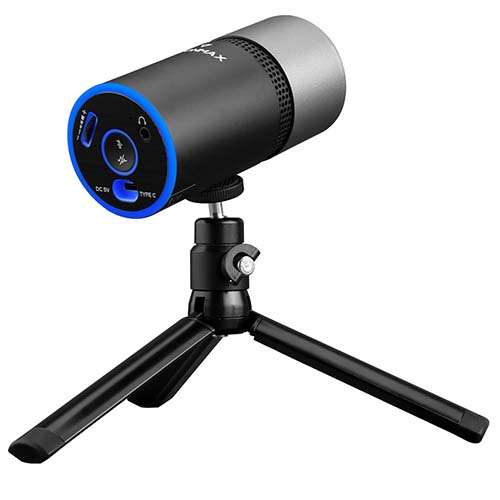
As for condenser mics, these are commonly used for radio broadcasts, podcasts and gaming, and are ideal for live streams where you, or your subject, is in a static position. Many come with mini desktop tripods or can be mounted to adjustable arms. These can provide better audio quality, and often plug into a computer via USB. A good option to consider is the Thronmax Mdrill Pulse, which is designed for streamers.
Camera Support
Now you have your shiny new streaming camera, you’re going to need somewhere to put it. Thankfully, we have a great selection of tripods sure to suit your needs.
For gamers, I would recommend a desktop tripod, such as the Rotolight Rotopod, or Benro Table Top Tripod. These compact, low-level tripods will nestle perfectly amongst your gaming set-up, without taking up too much valuable space.
If you need something with a bit more height, then most photography tripods are well suited to streaming. Though, if you’re doing a lot of camera movements, a fluid or pan-head tripod is a good bet. A great example is the Benro Slim Video Kit with S2CSH Head.
Accessories
There’s more to setting up a great live stream than just a camera. Take a look below to see what else we recommend for getting the best possible quality for your stream.
Audio
- Thronmax Mdrill Pulse USB Condenser Microphone
- Thronmax Mdrill One Pro USB Microphone (Slate Grey 96khz)
- Thronmax THX-50 Professional Headphones
Support
Cables
Hopefully, you’ve found something in this blog that answers your burning Live Streaming questions. But if you need any further assistance then feel free to get in touch and we’ll be happy to help!
Read Next
- Sony is for Vlogging – In-Depth Camera Comparison
- Sony Imaging Edge - Make your Sony Camera your webcam
- Why every Photographer needs an External Monitor
Thank you!
Thanks for taking the time to read our blog, we really do hope they help you out and answer some of your questions. If you still have some unanswered, then please feel free to get in touch with our team of experts.
We have a LiveChat option on our website and we can, of course, be contacted via our email, we're also on the end of the phone too! Read more on how to contact us here >
Want to write for us?
If you've got experience with producing content on photo, video and/or optics products or techniques then we would love to hear from you. Contact our blog editor, Bea, with a sample of your work at [email protected].
- By Joe Cullis
- 11 Nov 2022


